
We had a chance to stop by our local showroom in Atlanta to spend some time with the new Peloton Bike+. In this video we’ll go through some of the brand new features Peloton has been talking about, including the new Apple Watch GymKit integration, and the new Auto-Follow Resistance system. We’ll also look at some of the physical changes to the bike, including the new larger swiveling screen, how to adjust positioning on the new Bike+, the resistance system, and more.
If the video embed above isn’t working, you can see the video on YouTube. If you’re more into text, read on and we’ll cover all the new features, along with pictures.
If you just want to see the raw specifications and list of what has changed, see our post yesterday that has a table comparing the specs and more.
New Peloton Bike+ Swivel Screen & Rotation
One of the most promoted changes is the fact that the monitor on the new Peloton Bike+ is able to swivel. You are able now to rotate the monitor to face any direction you wish, for a full 360 degrees of coverage. One thing to note is that you can’t rotate it 360° in one smooth motion – it can rotate 180° to the left, and 180° to the right – which still ends up covering every angle. The other important thing to note with the swivel is that in order to rotate it away from the normal front-facing position, you have to slightly tilt it down before you start rotating it, otherwise the edge of the tablet will hit the handlebars.

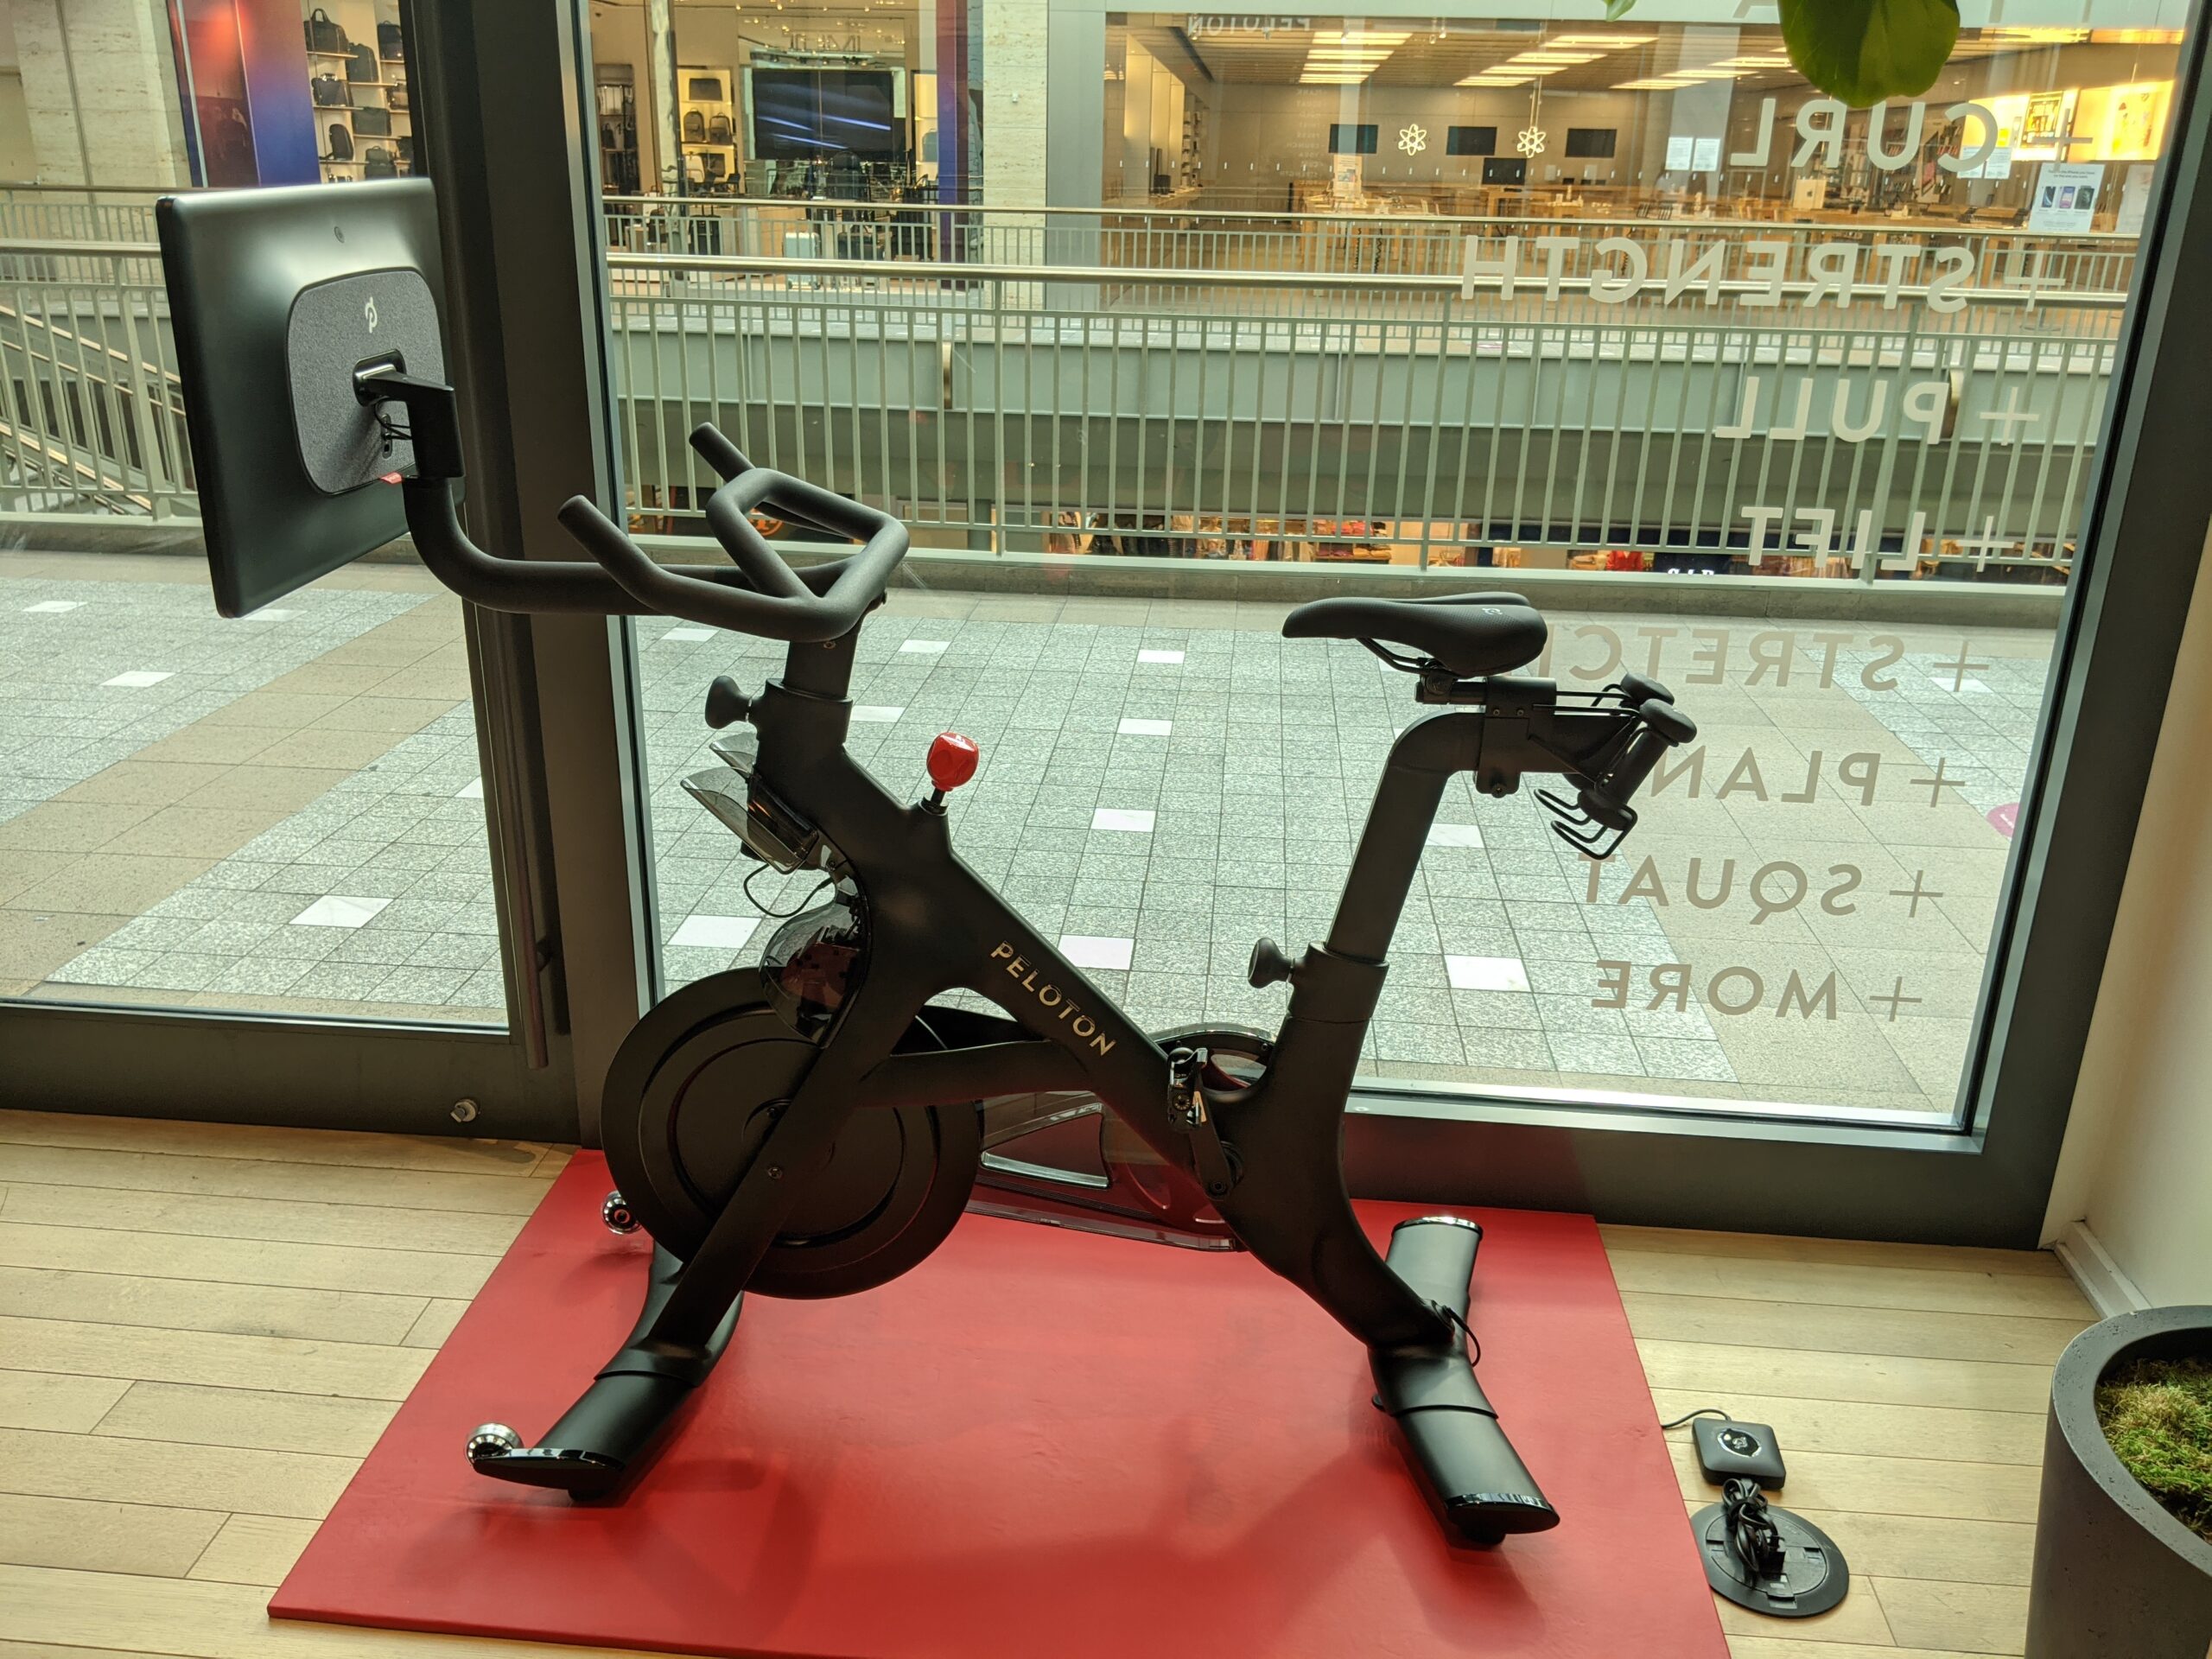
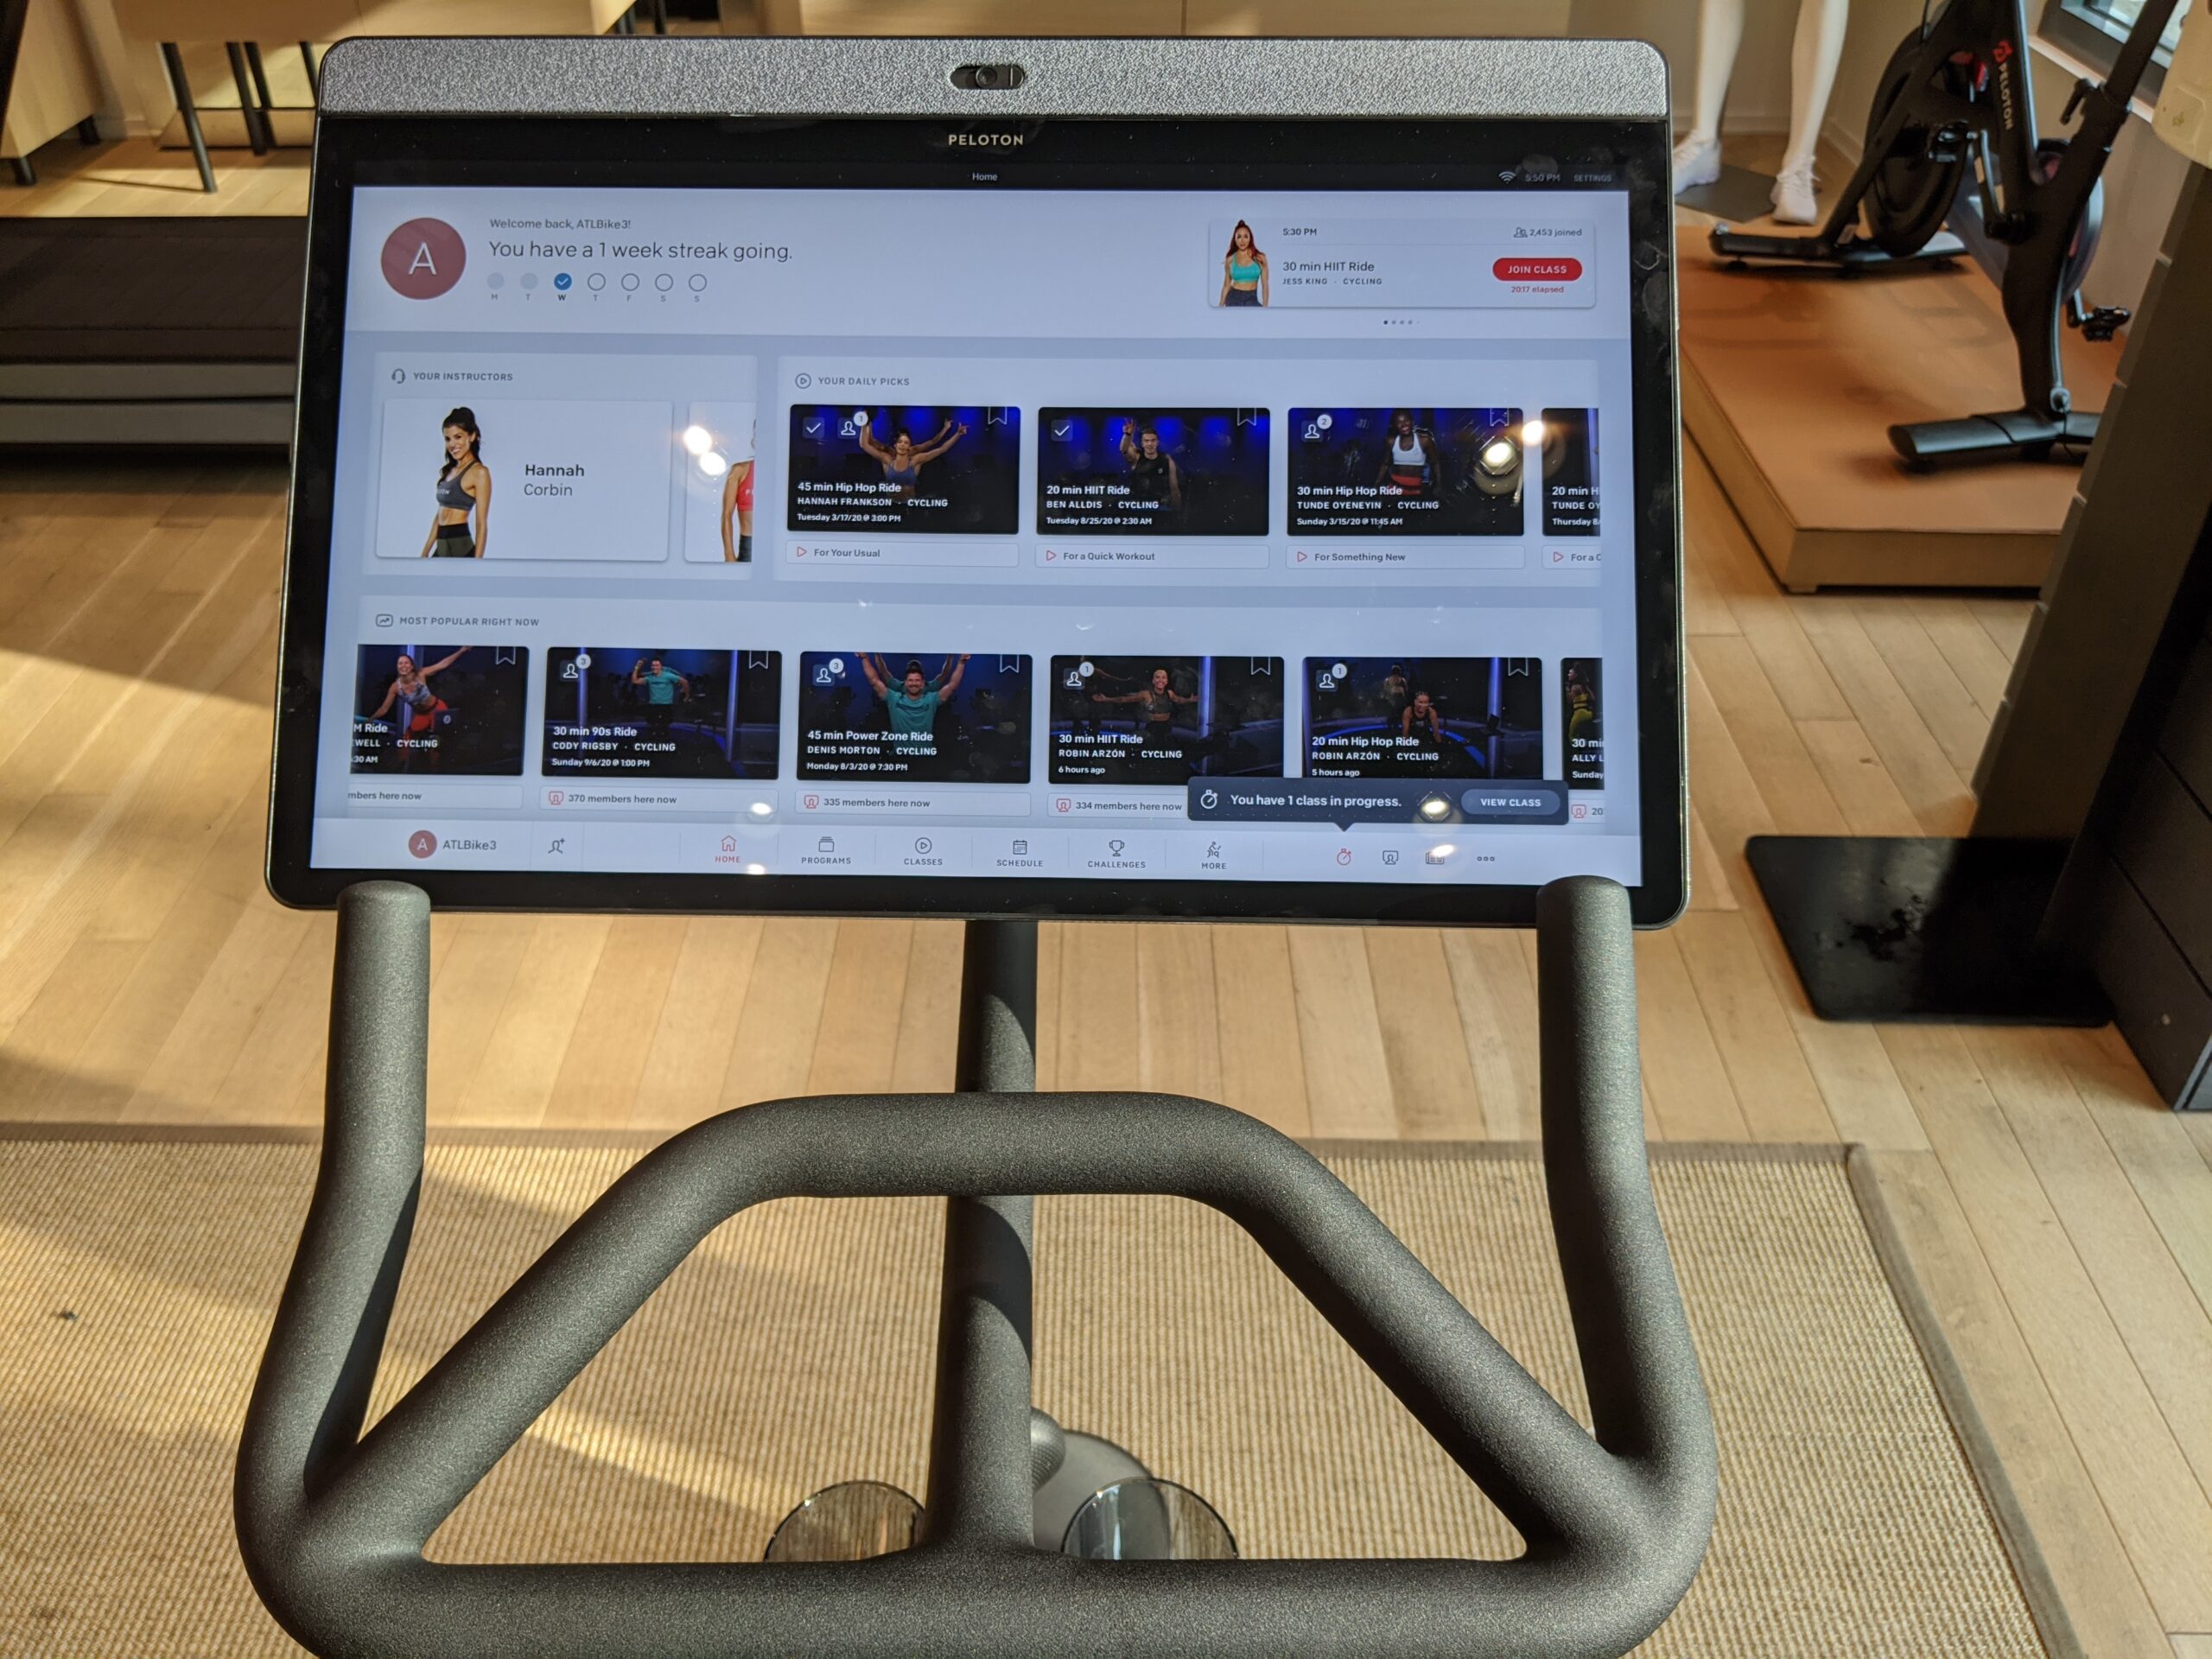
The physical monitor itself was upgraded with the new Bike+. It now measures 23.8”, compared to the original 21.5”. However, the resolution has remained the same at 1080P. The system internals have been upgraded as well to have a better processor and more RAM. When riding the bike, we didn’t particularly notice the bigger size, however, we imagine it will come in handy when using the monitor for bootcamps or floor workouts and you are further away from the bike.
Hands On & Demo of Peloton’s Auto_Follow Digital Resistance System
Another big feature everyone has been discussing is the bike’s ability to automatically change your resistance to match what the instructor is calling out. Peloton is calling this the “Auto-Follow Digital Resistance System”
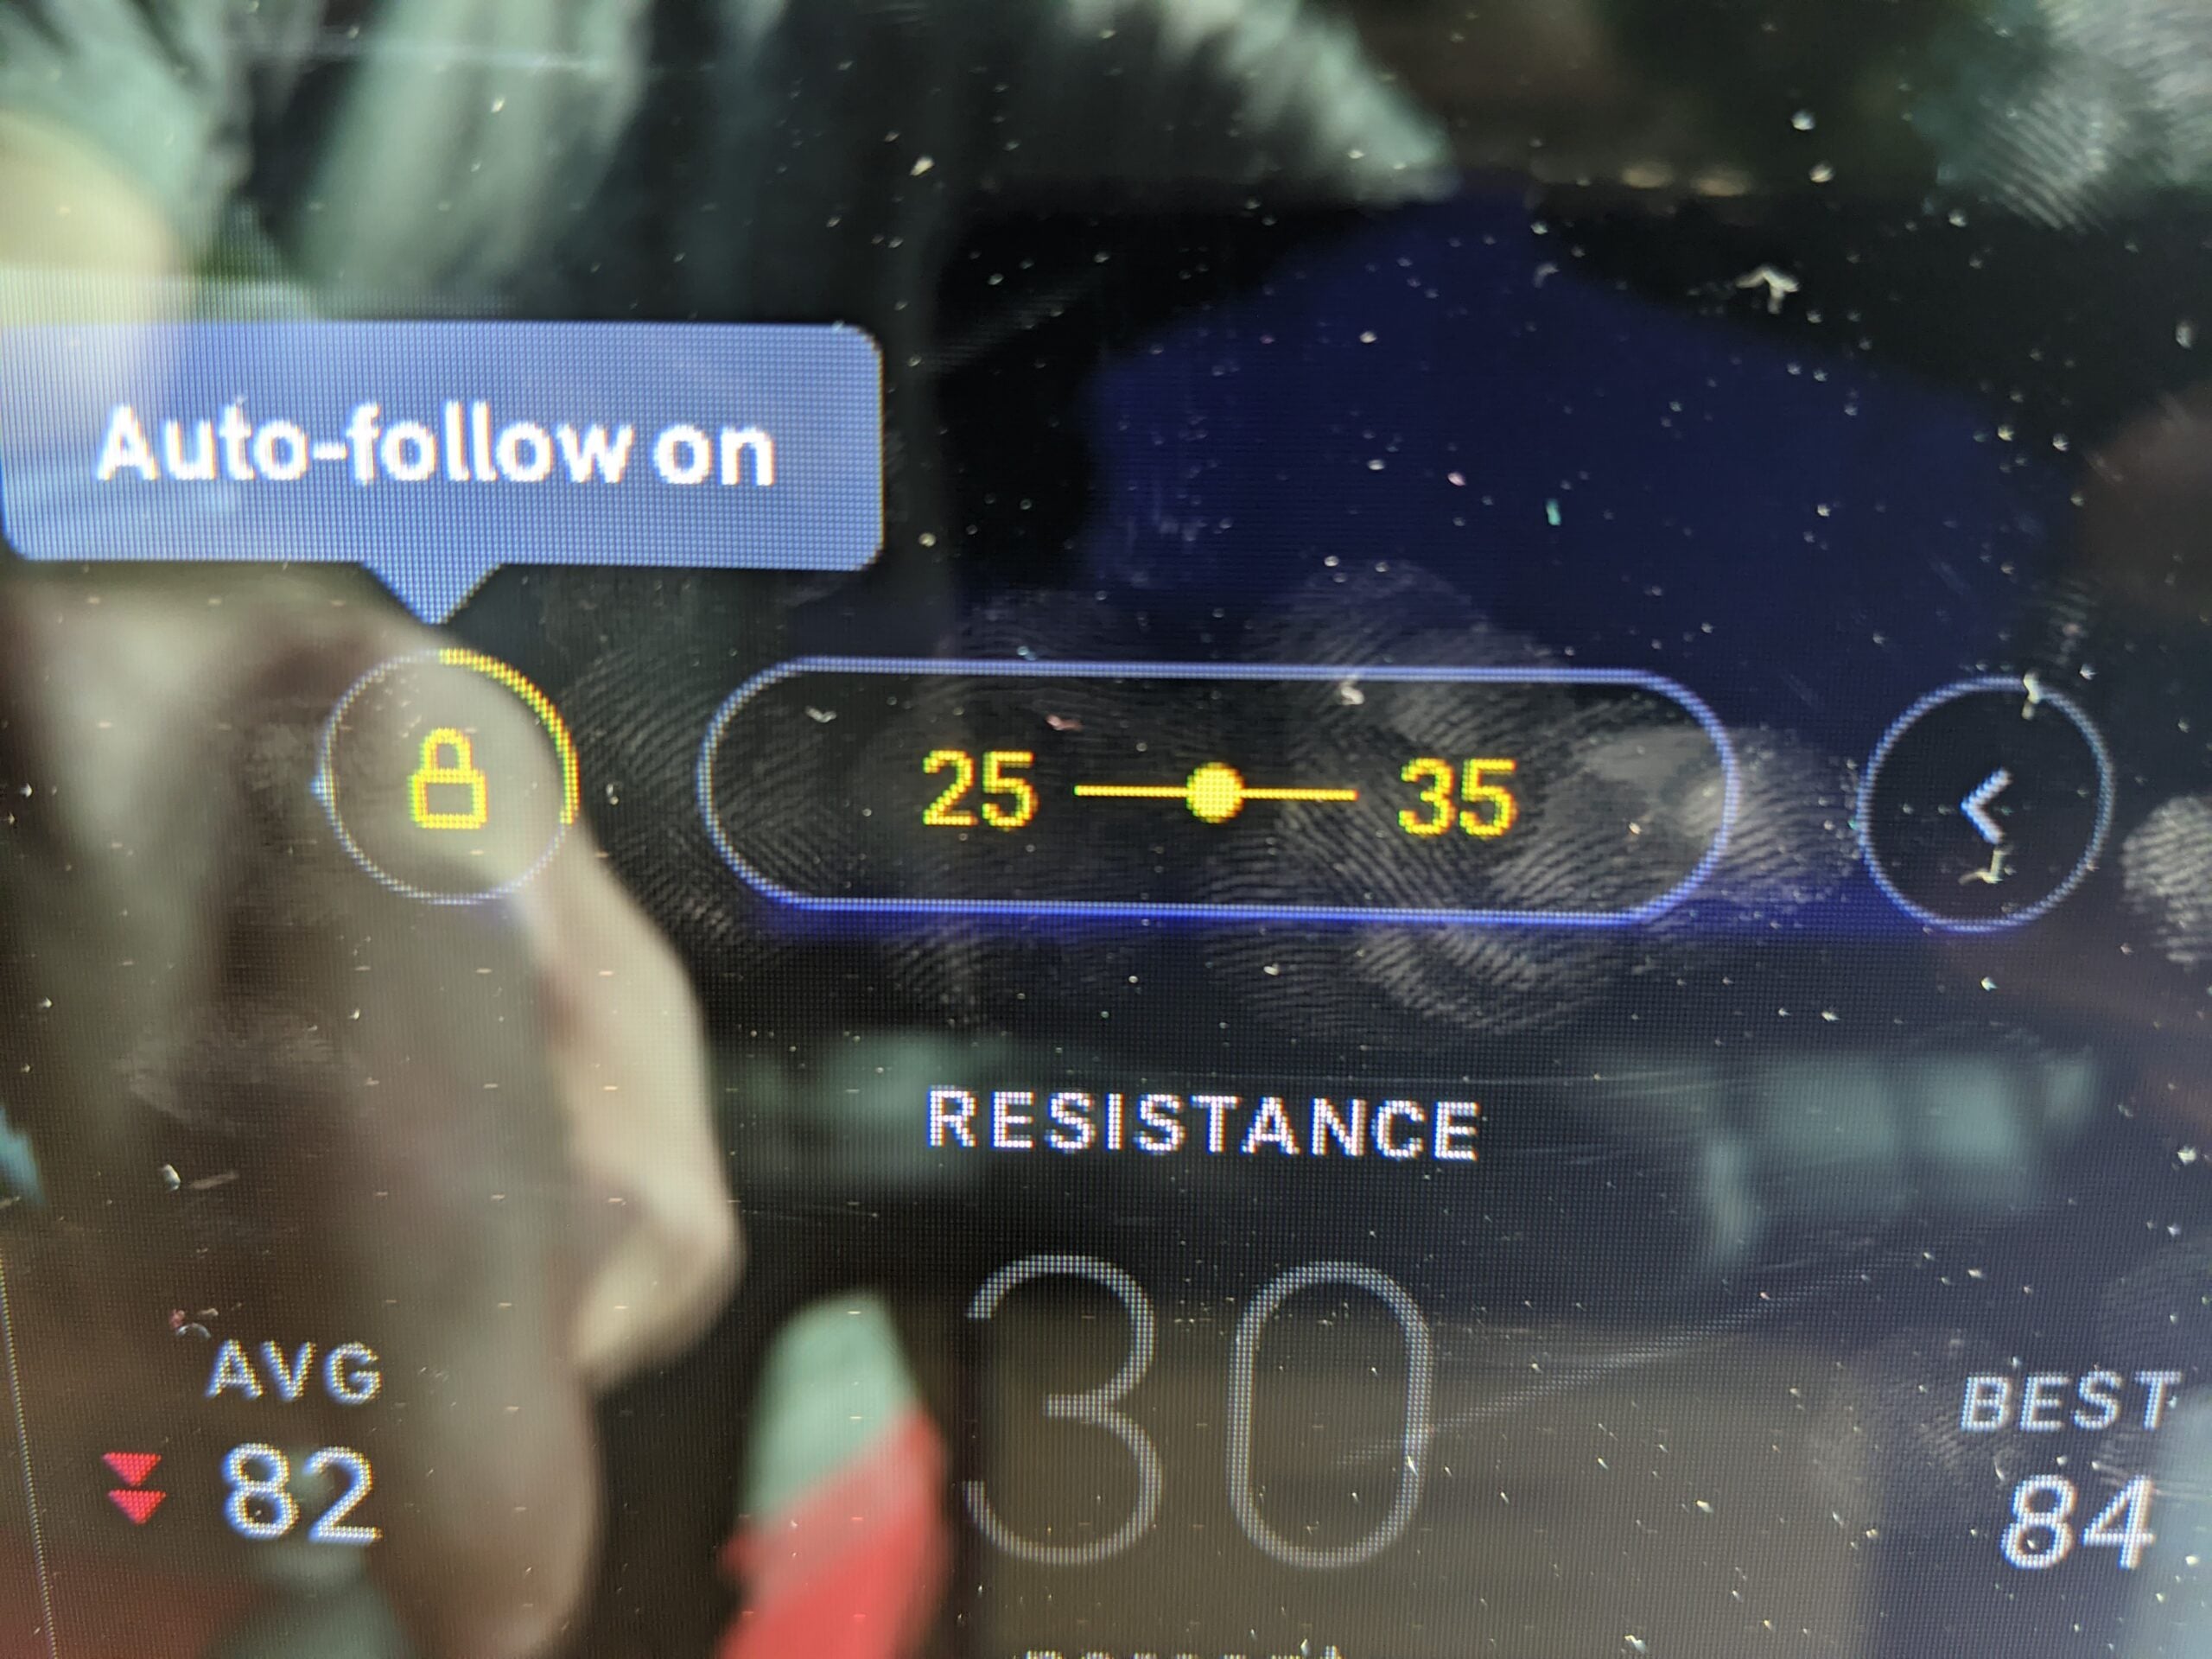
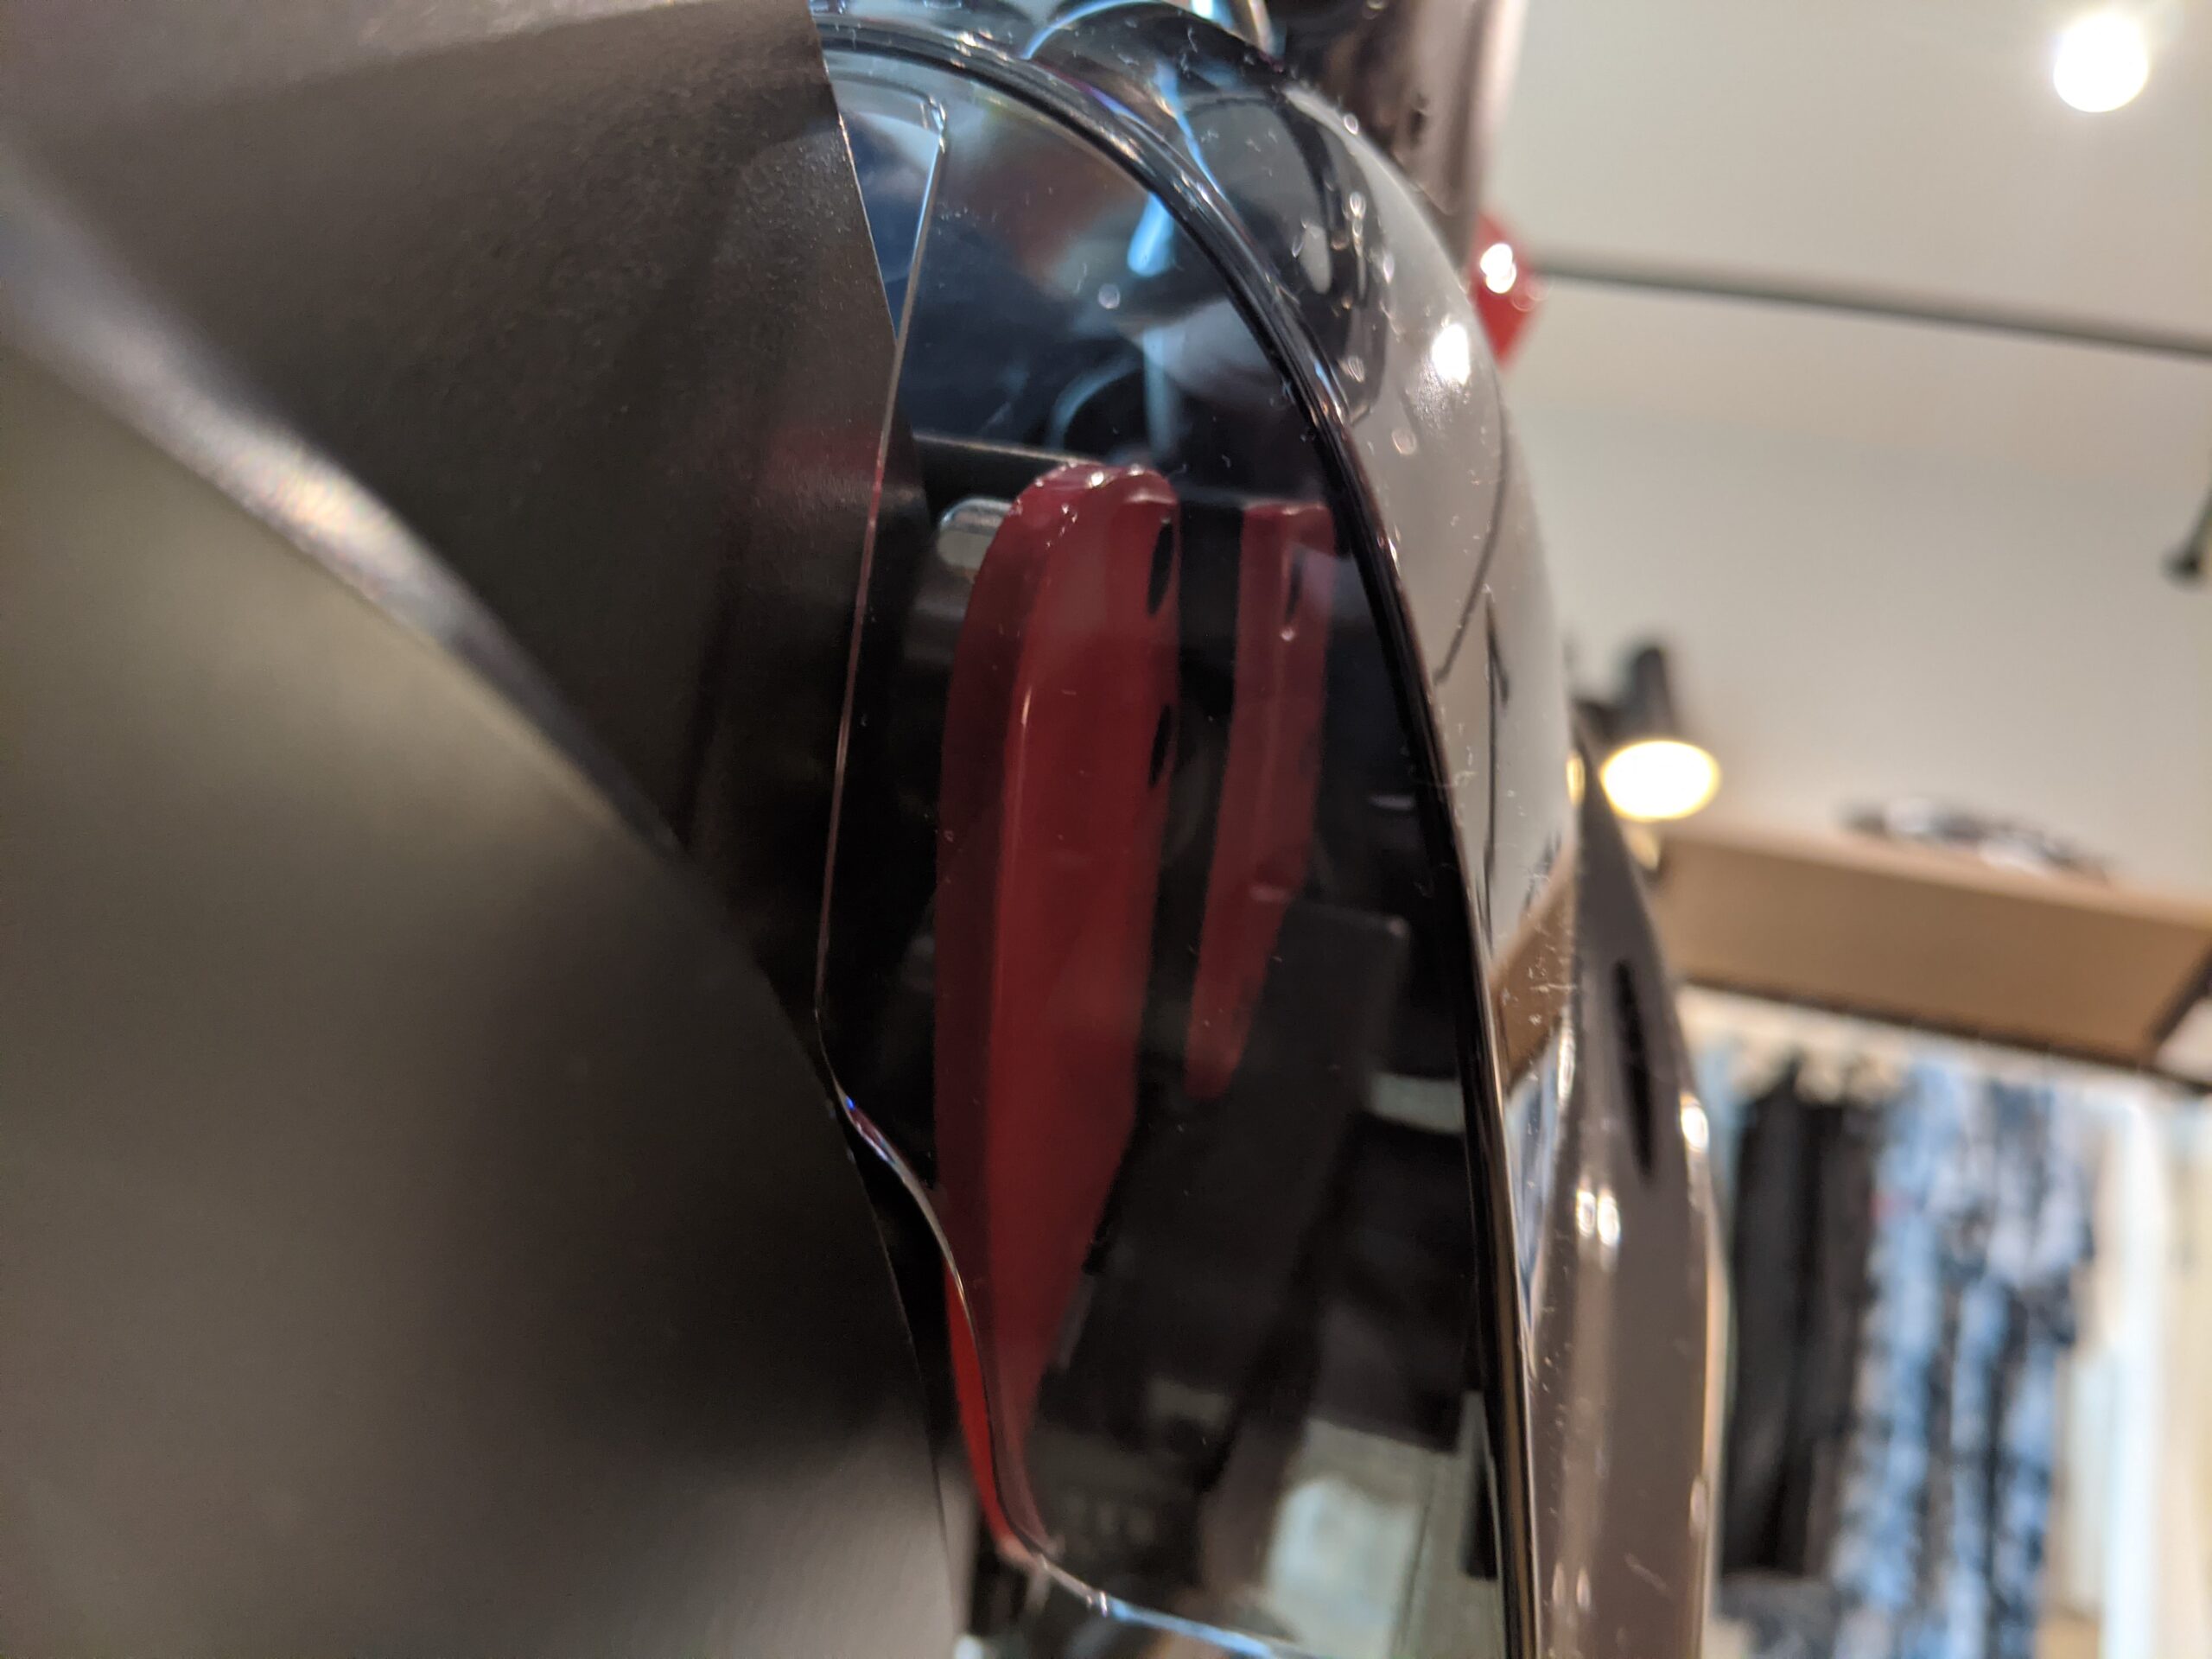
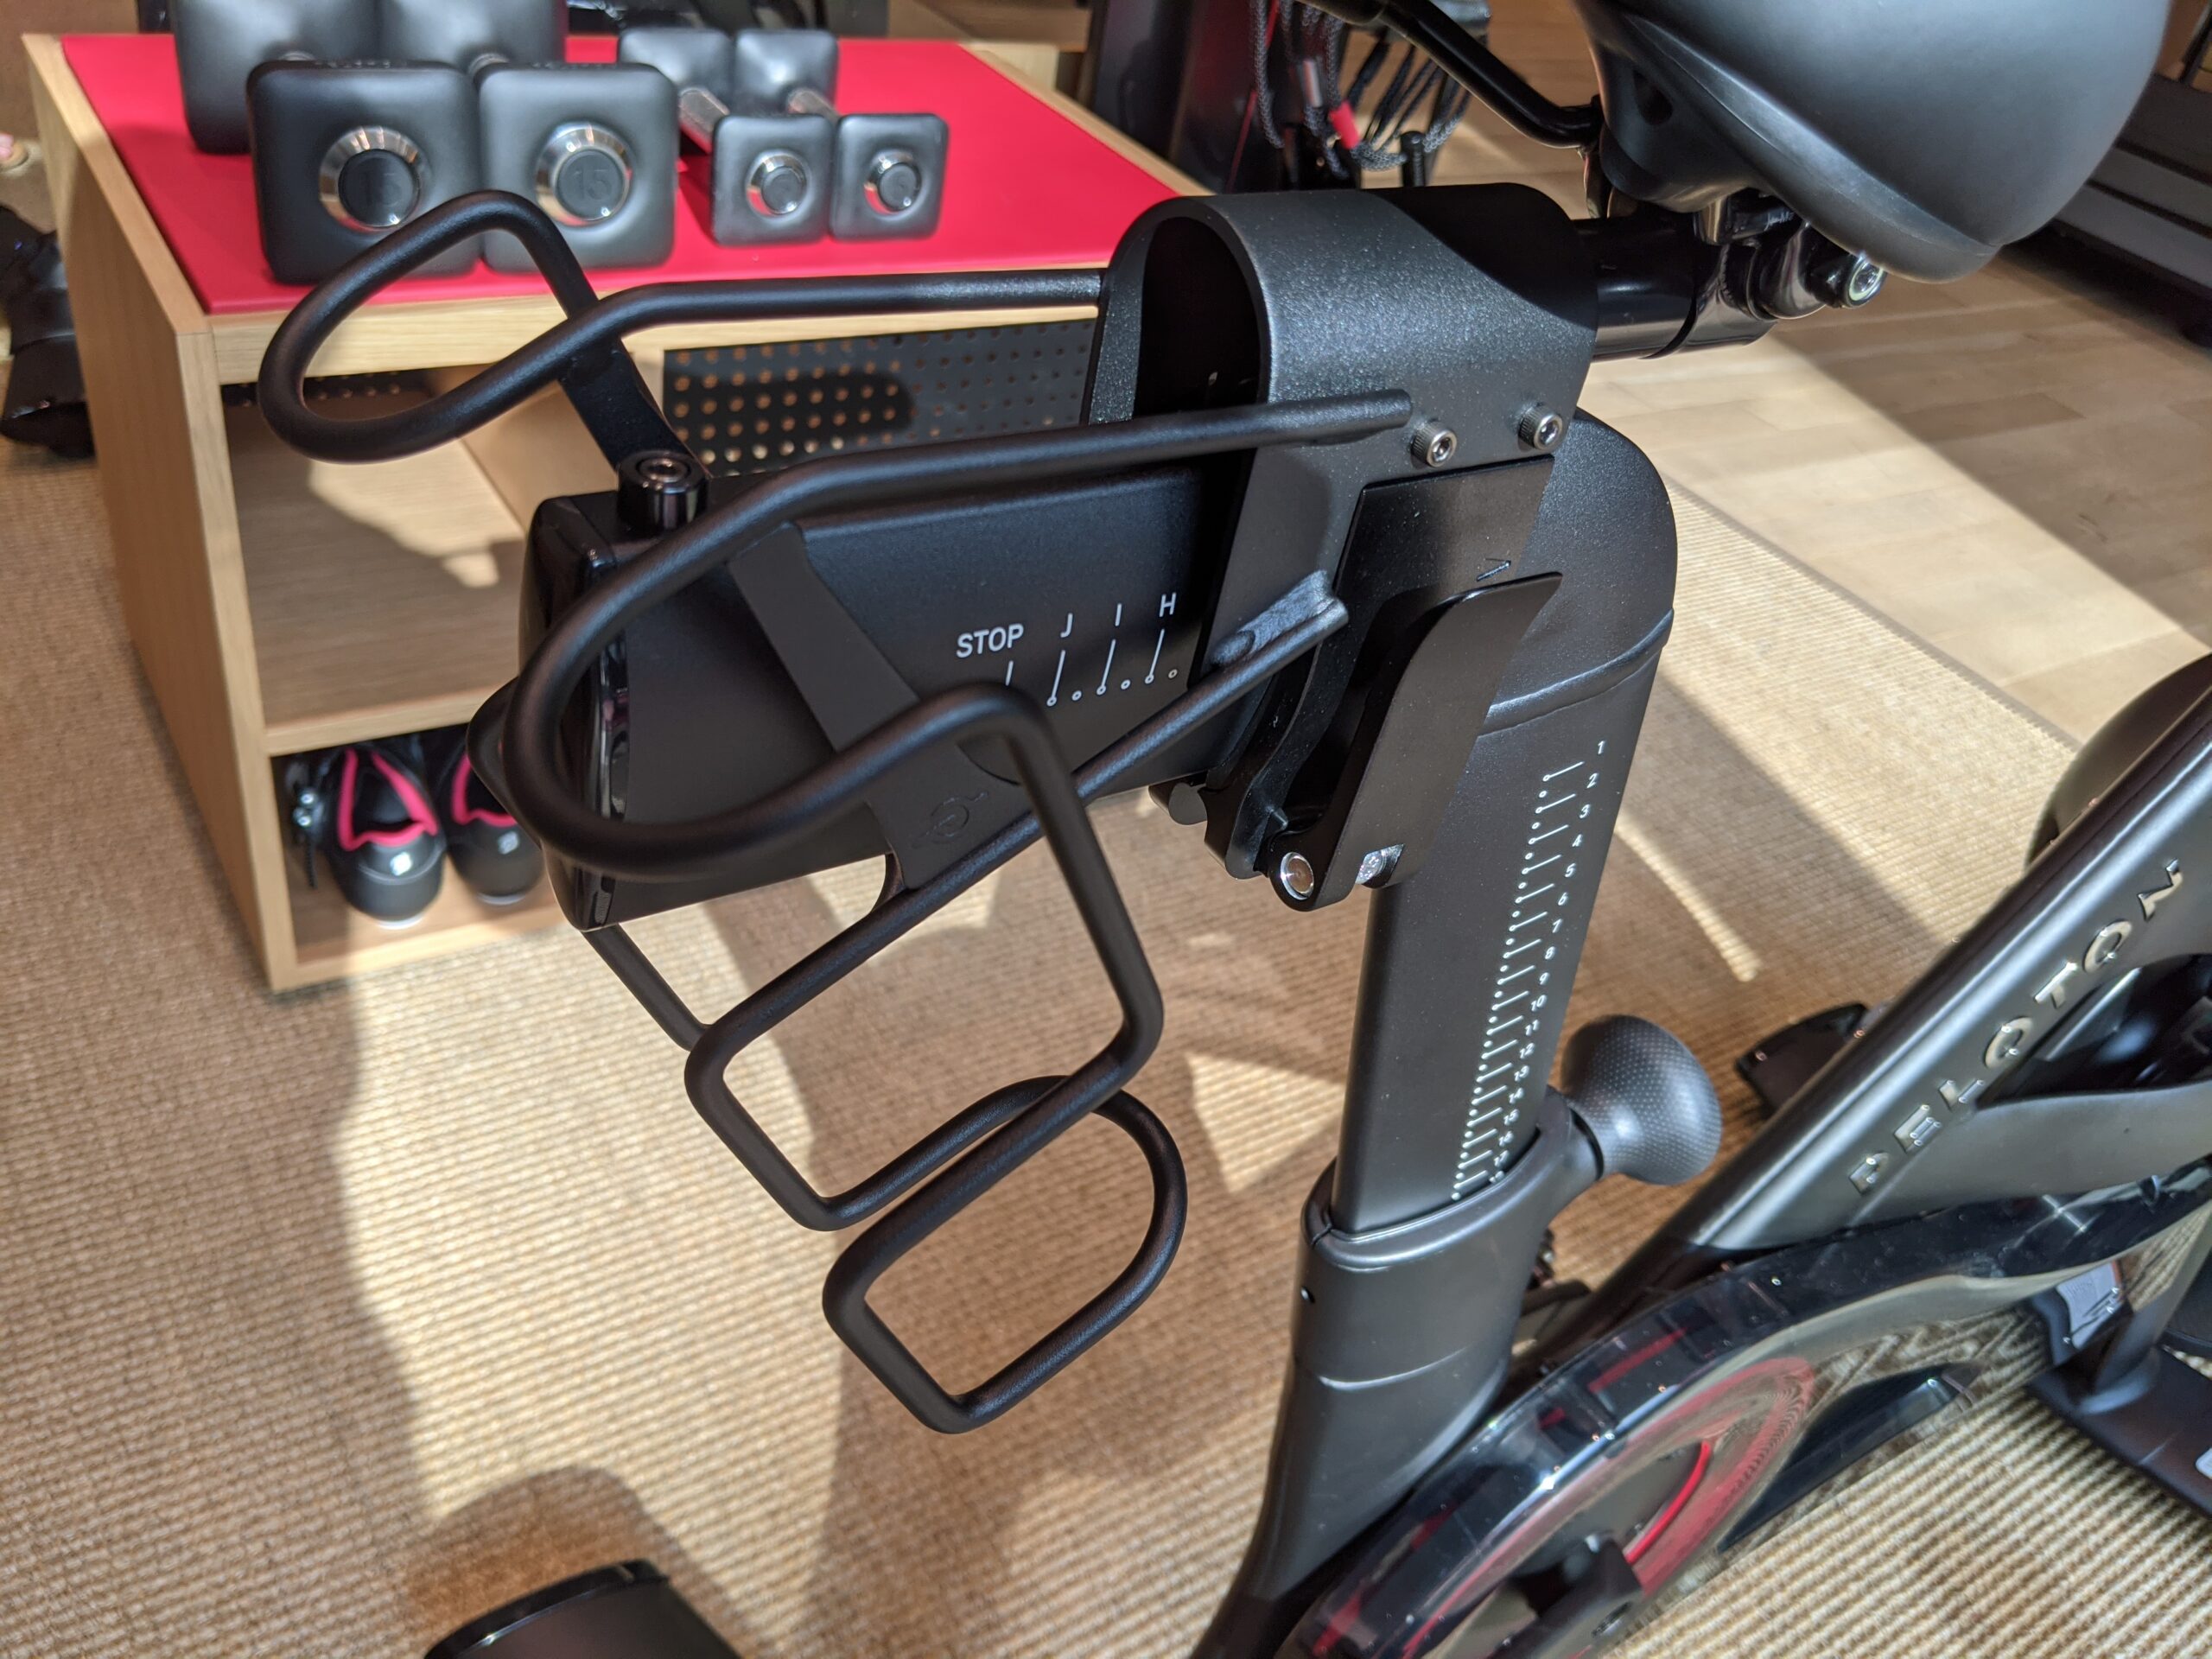
Before we go into that feature, now is a good time to look at how the resistance system itself has changed. You still have the same traditional resistance knob you turn to manually control your cadence. However, this knob now appears to control a digital signal rather than a physical signal. On the old bike, once you adjusted your resistance to 0 and kept decreasing it, you would hit a physical limit stopping you from turning it more after a turn or two, depending on your calibration. The same physical limit happened a turn or two after going over 100 resistance. On the new Bike+, the knob will spin an unlimited number of time in either direction.
On both the old bike, and new Bike+, turning the knob controls magnets over the flywheel. As the knob turns to add more difficulty, the magnets are lowered over the flywheel more, creating more resistance. As the knob turns to remove difficulty, the magnets are lifted away from the flywheel, until at 0, the magnets don’t cover the flywheel at all, creating 0 resistance. Moving the knob on the new Bike+ causes the magnets to move in the same way. The one thing to note is that when using the auto-follow resistance system, when the bike automatically increases resistance for you, the magnets are lowered or raised appropriately, however, the resistance knob itself does not move. One final note about the magnets – on the original Peloton bike, when you push the resistance knob down for a hard stop, you can physically see the magnets lowered to their lowest position. When pressing the resistance knob on the new Bike+, there is no physical movement of the magnets – it appears there is another system in place for a hard stop.
With that segway aside, back to the new auto-follow resistance system. The first thing to note is that this feature will only work on on-demand classes. The reason for this is the system is controlled by the Target Metrics you see displayed on your rides – and those are not broadcast live – they are added after the fact for the on-demand library. So just note that pending some future change, auto-follow resistance will not work for live classes! It also won’t work for power zone classes, or any other class where target metrics are not added.
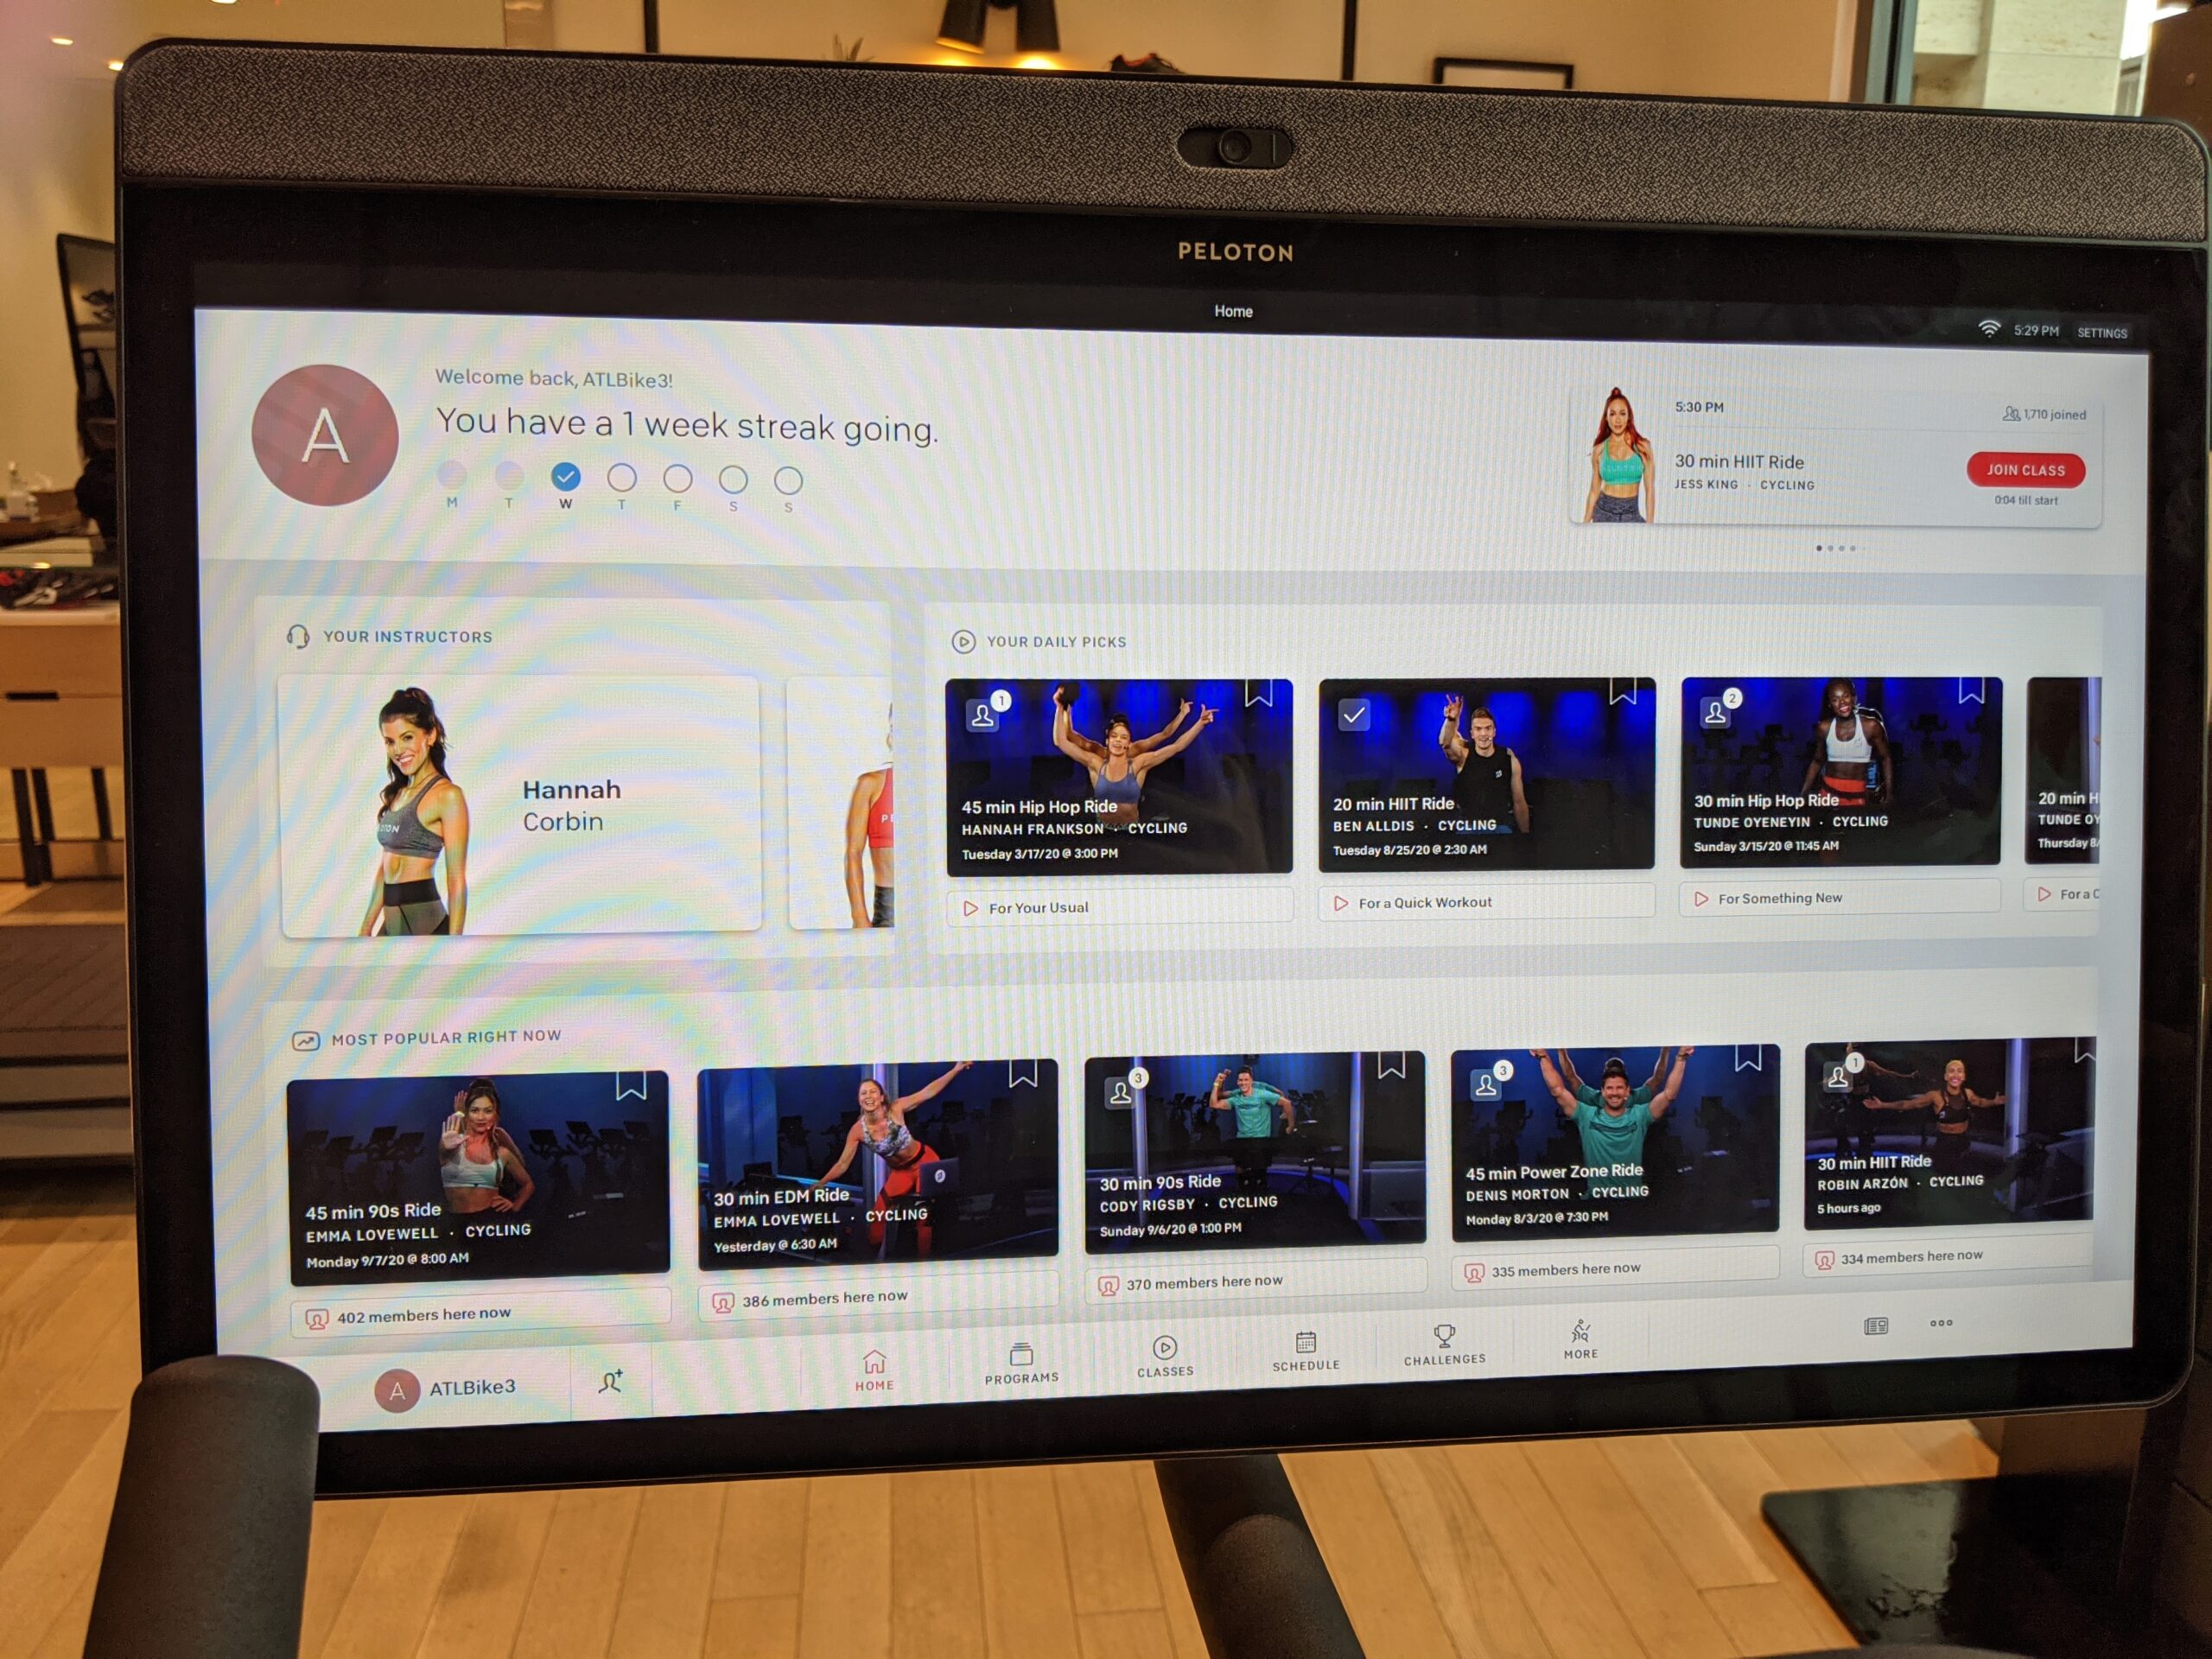
Starting yesterday, the Peloton user interface was modified for all Bike users, on both the old Bike and new Bike+. The resistance range for target metrics are now displayed in a slider interface. For the new Bike+, you’ll also see a lock icon to the left of this slider. This is the one-touch toggle for turning Auto-follow resistance on or off. The system is fairly straightforward once you’ve seen it.

To turn on Auto-Follow resistance for the first time, touch the lock. The bike will then automatically adjust your resistance to be in the middle of the cadence range the instructor currently has called out. You may then manually increase, or decrease, your resistance however you wish using the physical resistance knob. When the instructor calls out a new cadence range, the bike will automatically adjust your resistance for you. If you haven’t manually adjusted it, you’ll remain in the middle of the new range. If you manually adjusted your resistance to be at the top of the old range, you’ll be at the top of the new range. Same for if you had manually adjusted to the bottom of the old range.
One hidden feature is that the lock icon actually shows you how much time is left in the interval. There is a line that goes around the circle that shows how long is left until the next interval.
The one issue with how this works is if you manually adjust your resistance to somewhere outside of the prescribed resistance range. When using auto-follow, the system will never adjust your resistance to be outside of the target range – even if you were manually riding over or under it. This is best shown with an example – let’s say the instructor called a range of 30-40 out, but you had changed your resistance to 50 manually. The instructor now calls out a range of 35-45. Since your manual resistance had been +10 over the high point of the previous range, you might expect the system to auto-change your resistance to 55. This is not what happens – instead, you’ll find your resistance will actually drop down to 45. This same issue happens if you find yourself lowering your cadence under the target ranges – if you are riding at 25 resistance during a 35-40 segment, and the instructor calls out a new 30-35 segment, your cadence would then JUMP to 30, to match the low end. It’s possible there is a setting buried somewhere to override this, but we were not able to find it. It is likely set up this way for safety and legal reasons. We imagine this will end up preventing a lot of riders from using the system though.
You are able to turn off the auto-follow resistance system at any point by simply tapping on the lock icon again.
Hands On & Demo of new Peloton Bike+ Apple Watch integration with GymKit Express
One other feature that many Apple users will be glad to see is a new GymKit integration. This might be called GymKit express, as it actually allows you to pair your Apple Watch with a Peloton Bike+ with one touch. In practice, it usually took us more than one touch to get the pairing to happen, but that might have just been due to the newness of it.
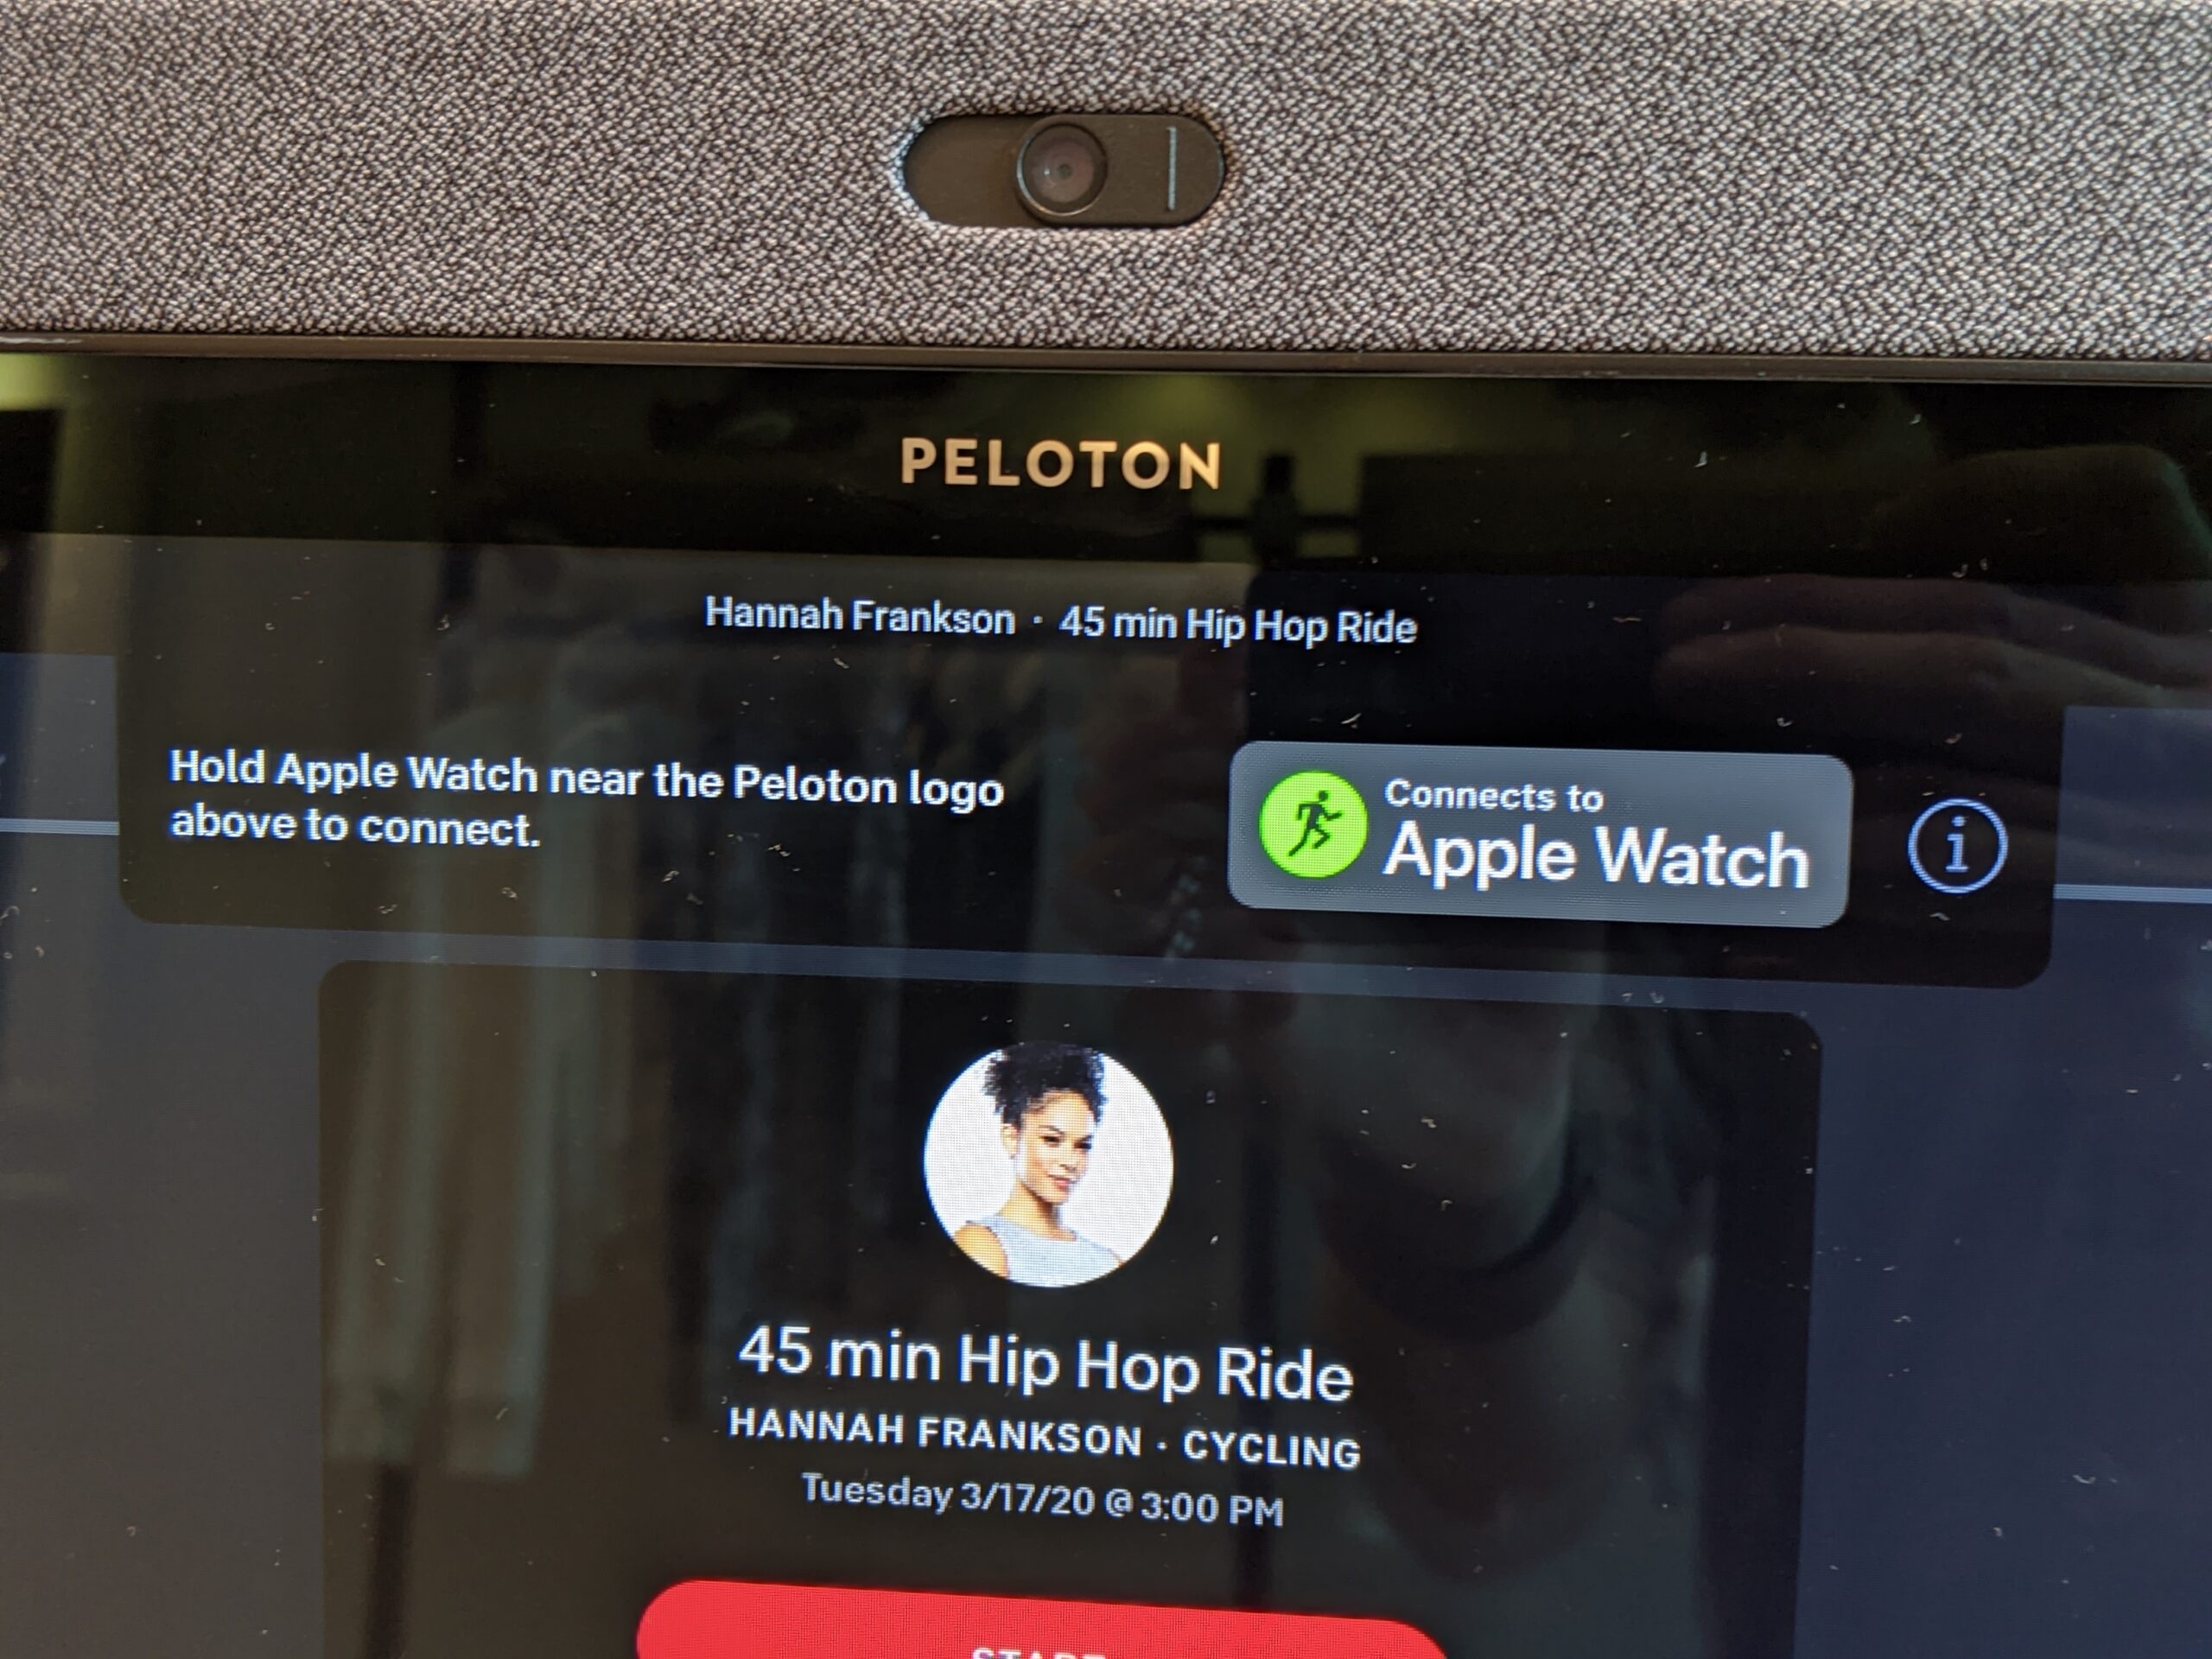
Once we got it paired though, it operated just like we would expect any heart rate monitor to – the heart rate showing on the watch always matched what showed on the screen – no other steps required. This will be a big relief to many Apple Watch user, as a frequently asked question on the old bike was how to use the Apple Watch as a heart rate monitor there. There were some third party apps that allowed it like HeartCast, or Blueheart, or even hardware devices to help like the NPE Heartbeatz – all of which are no longer necessary with the new Bike+ .
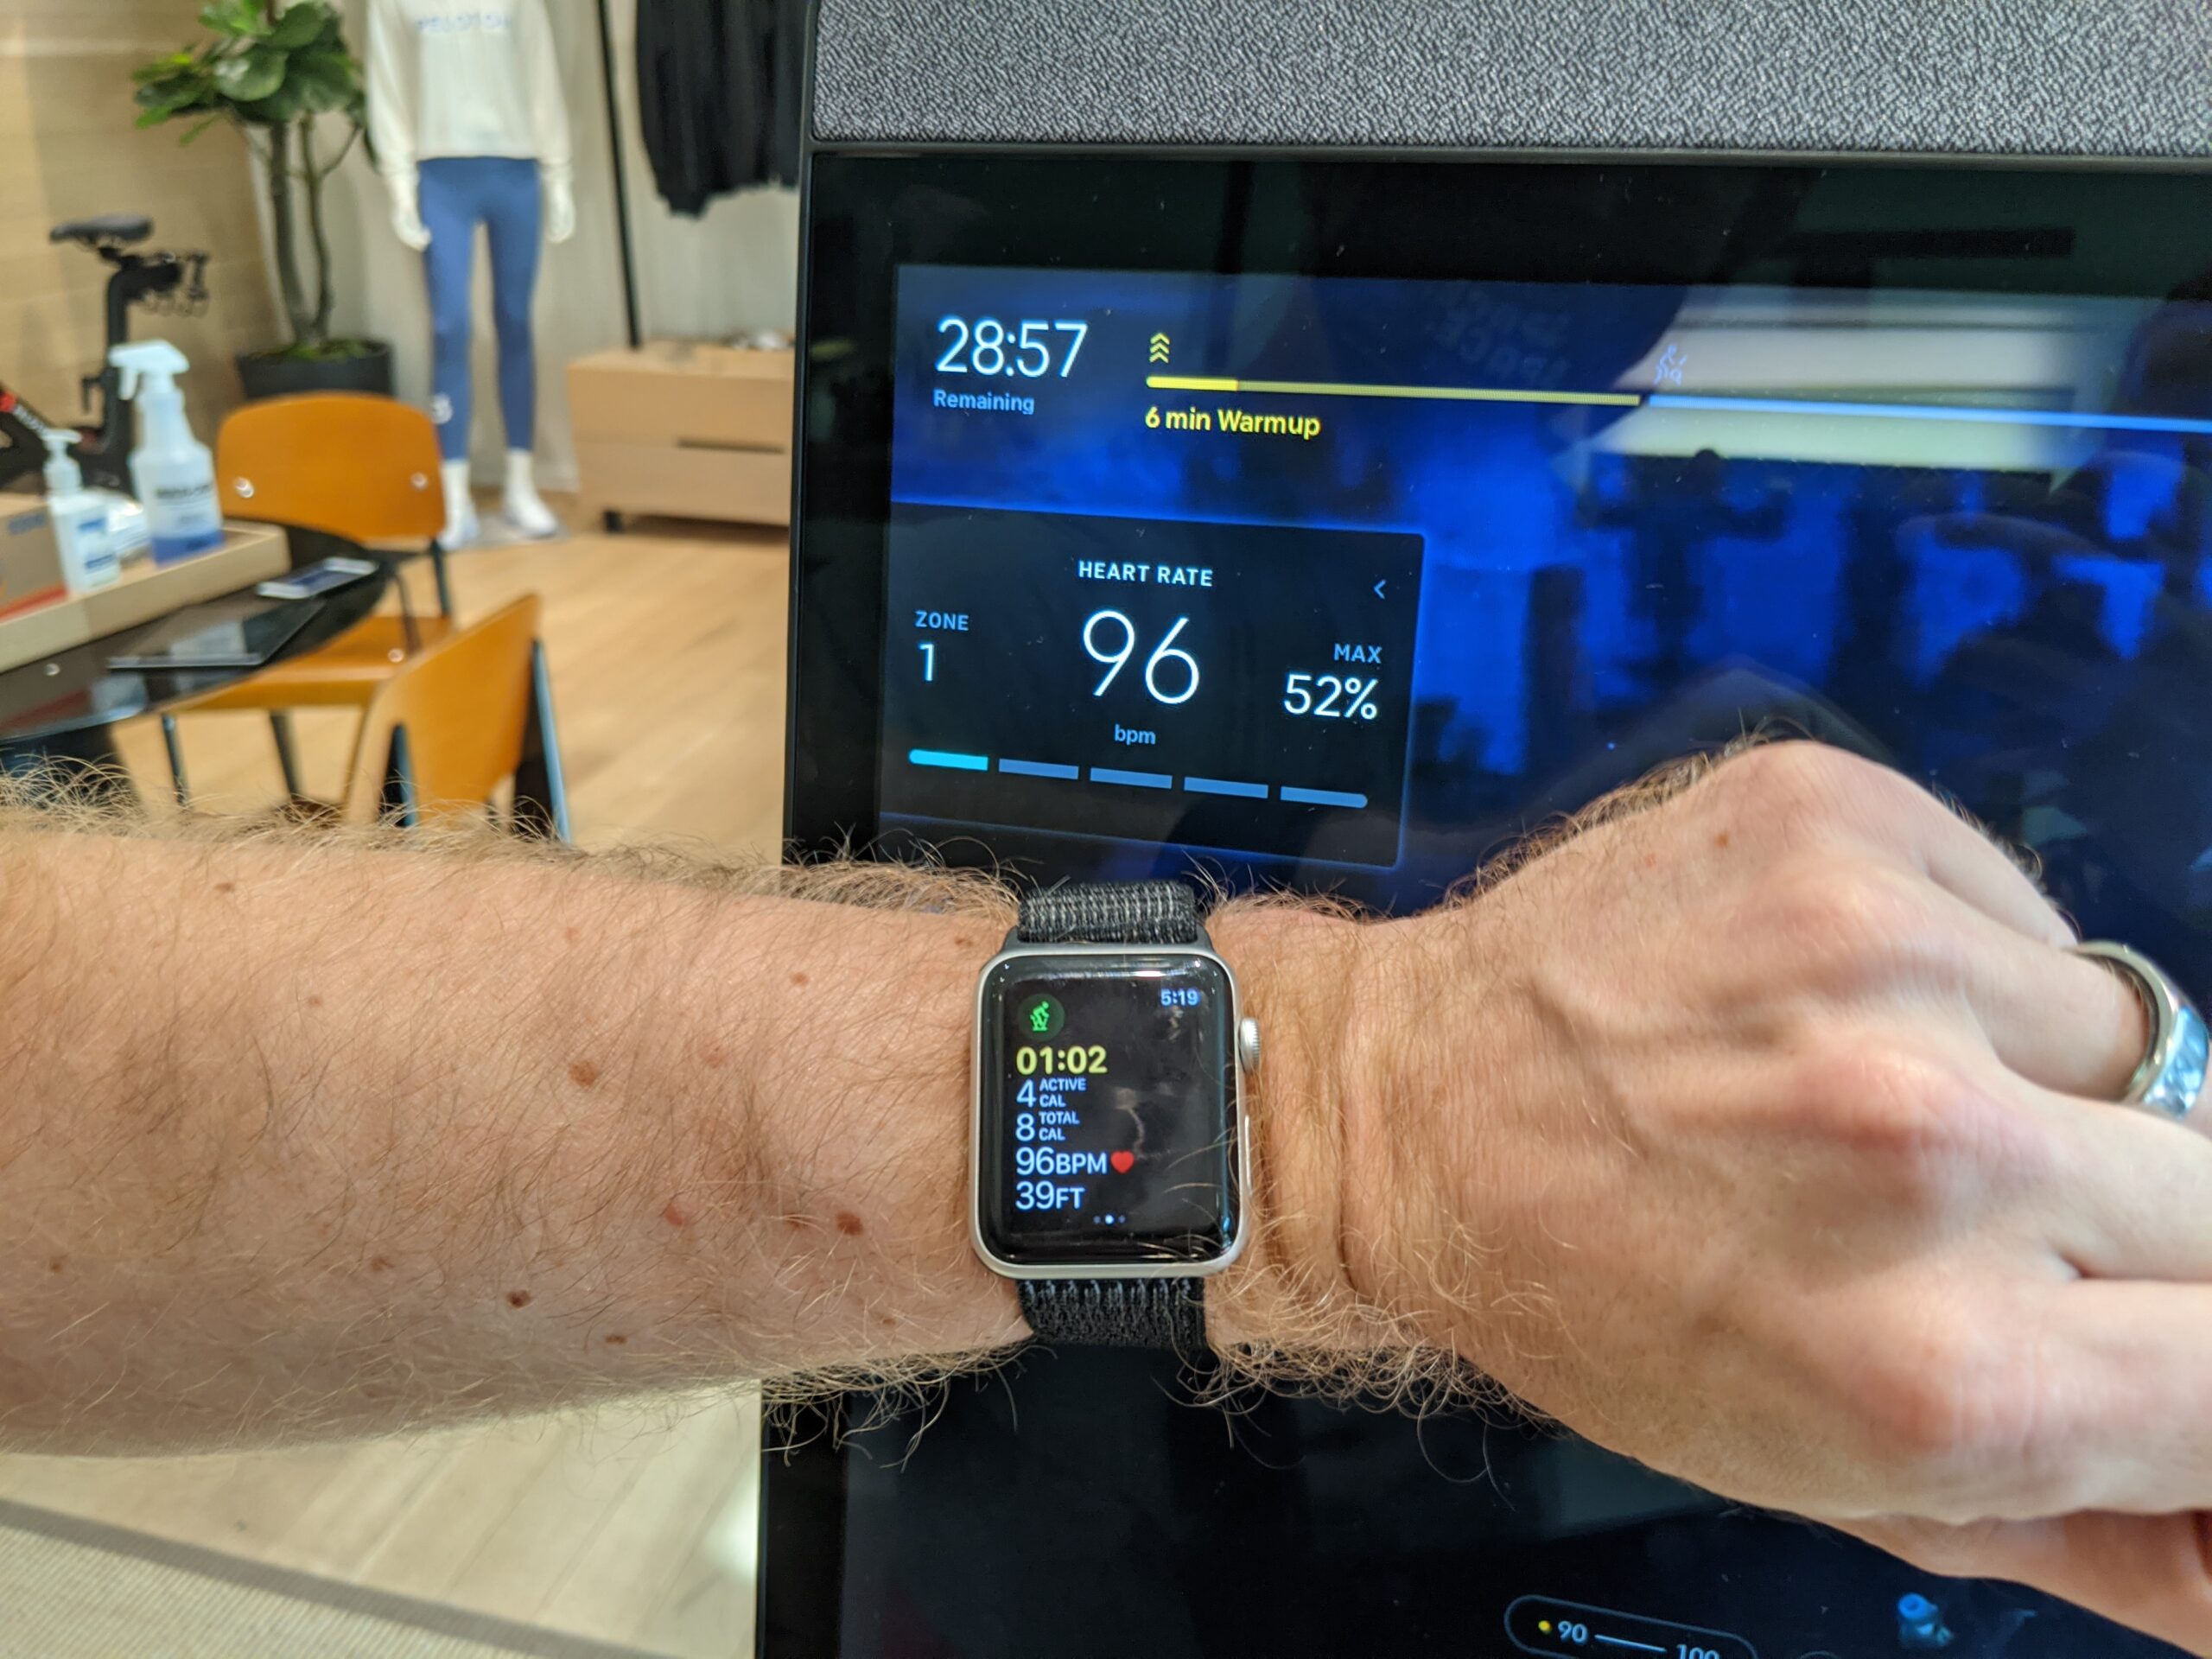
Once you select a class and hit start on the bike, a workout starts on your watch as well. In addition to seeing your heart rate, the workout is also fed information from the bike like the elapsed time, and your total mileage, which you can see on your watch. Since the ride is being tracked through the Workout app in the watch, completed workouts should immediately show up in Apple Health, helping ensure your rings are closed immediately – no having to open the Peloton app to try to force a sync.
Overview and pictures of hardware changes to Peloton Bike+
With the big software changes out of the way, let’s now look at a few of the various hardware tweaks Peloton has made to the bike.
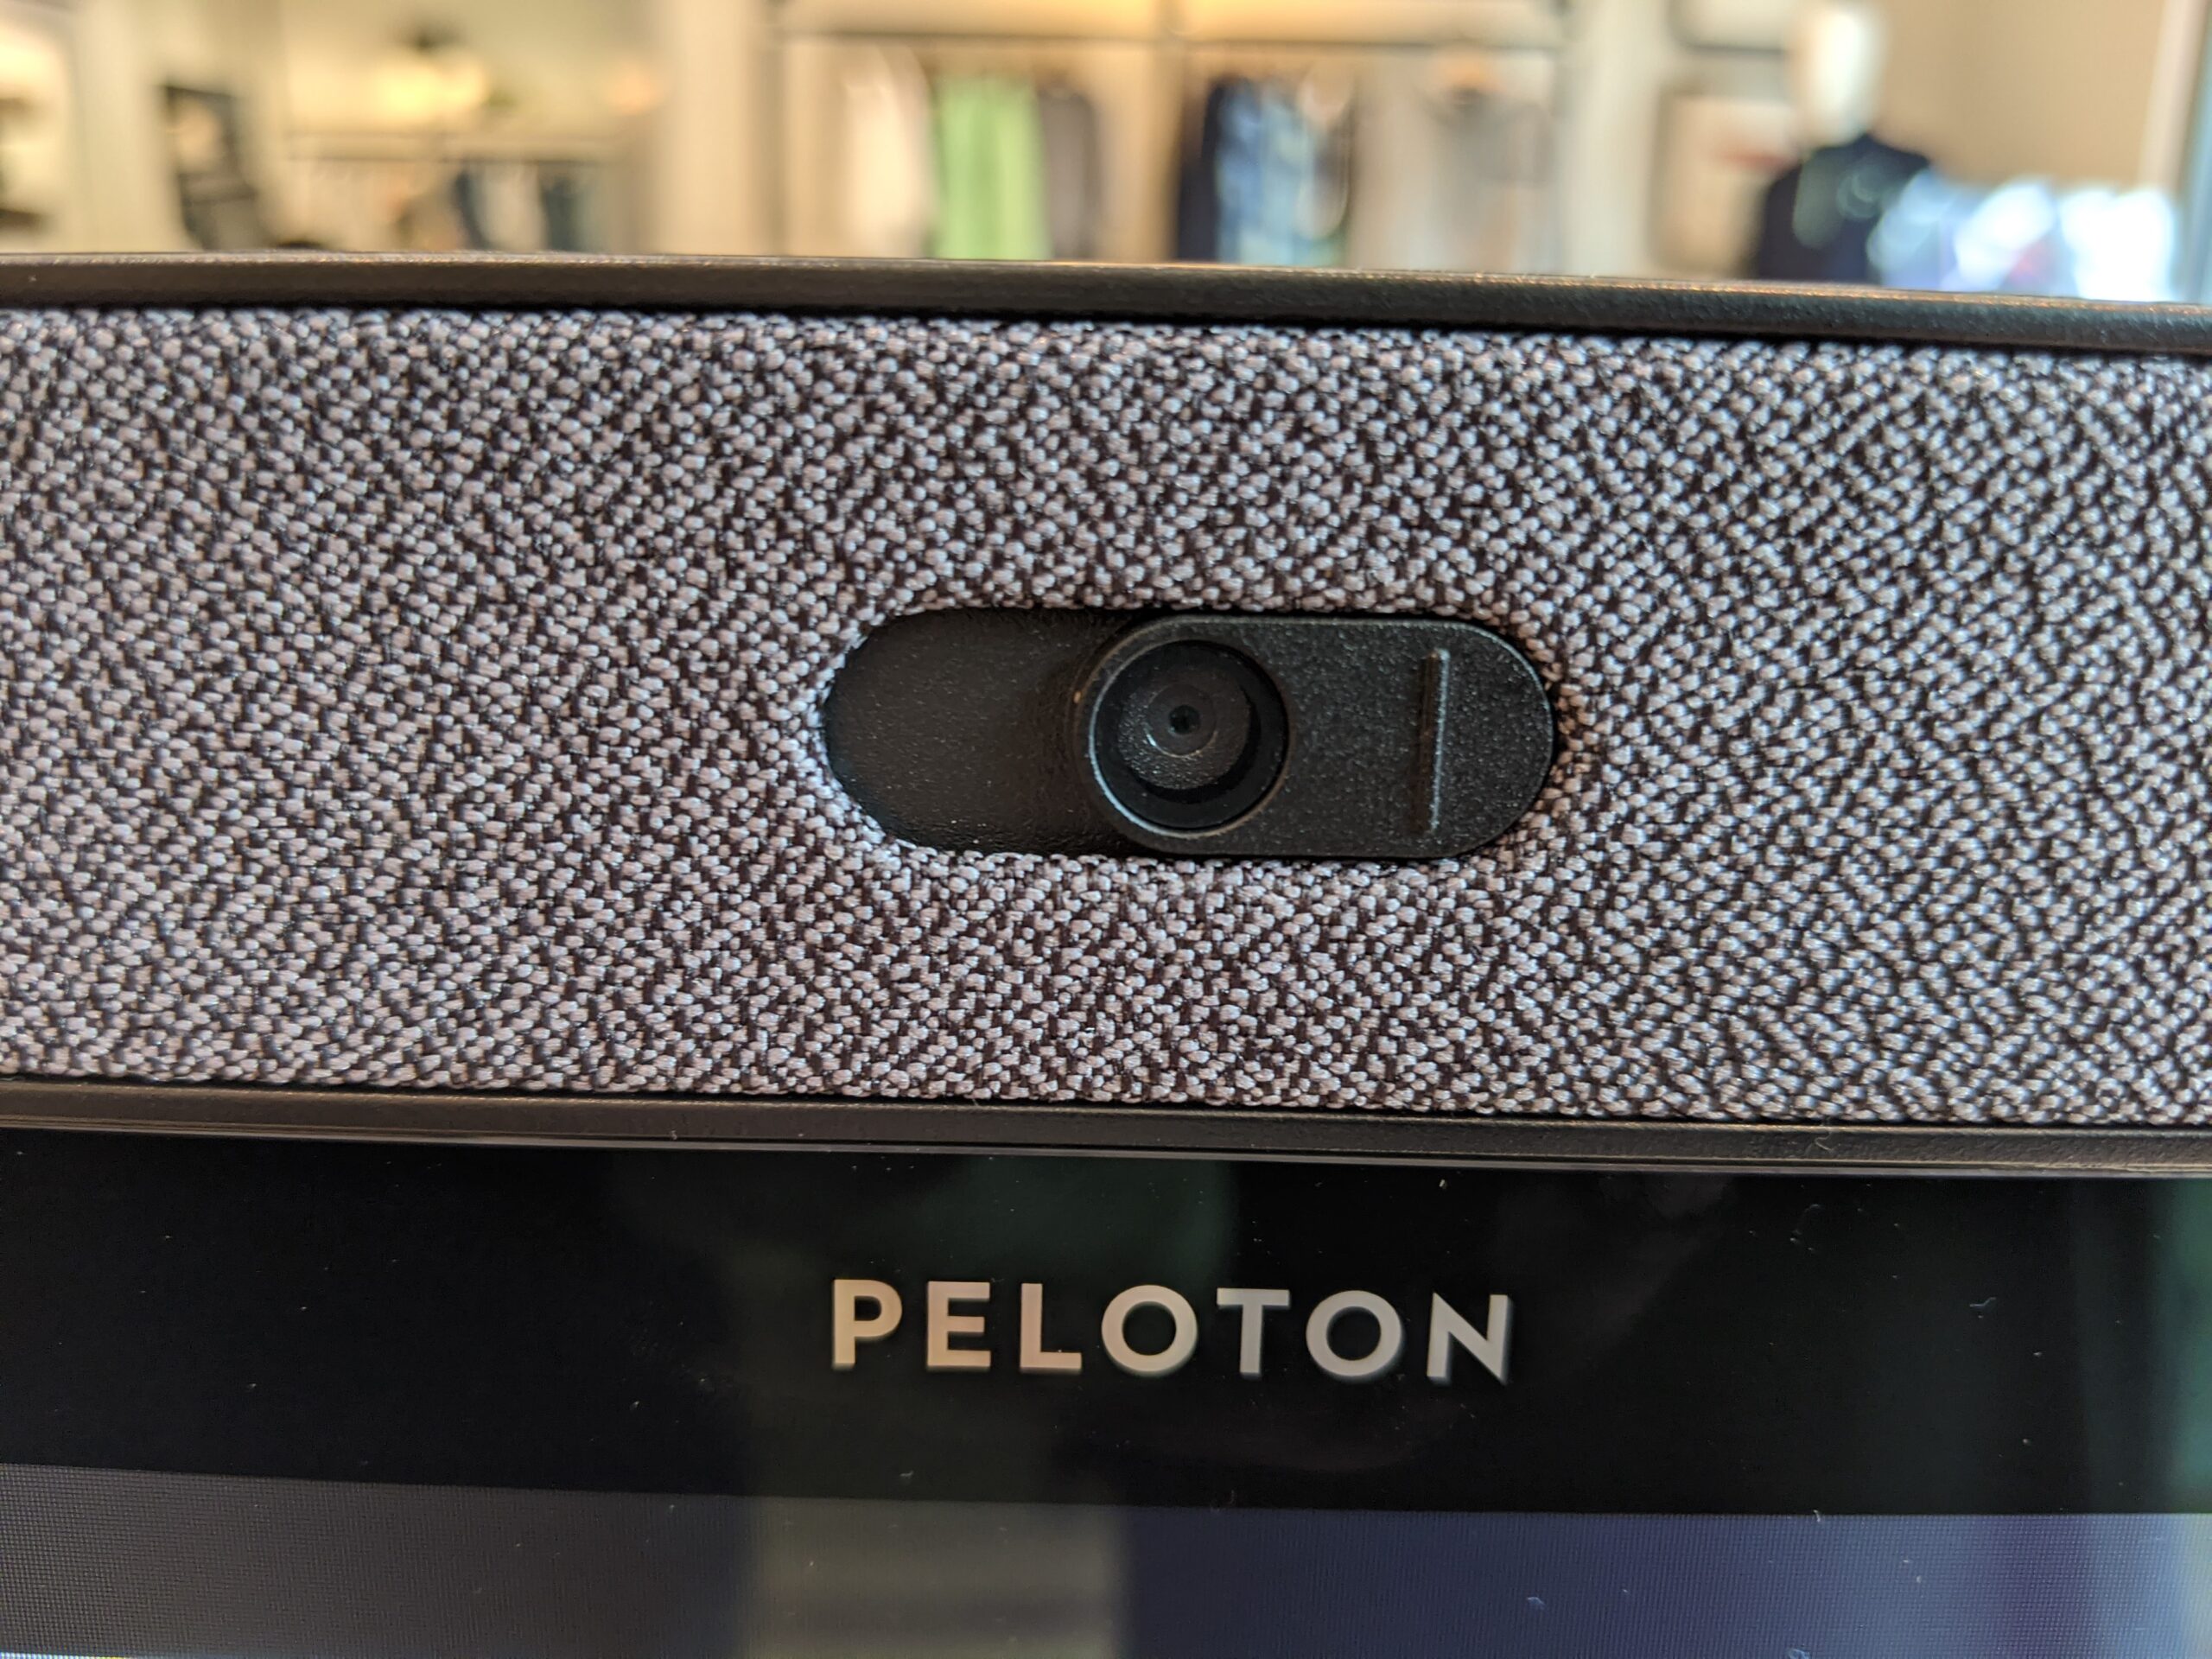
Like the old Bike, the new Bike+ has a video camera on the front to allow you to chat with friends during rides. However, the new Bike+ includes a physical toggle to completely cover up the camera if you wish, ensuring that even if a hacker is able to somehow turn on the video camera without your knowledge, it won’t stream any visible video.
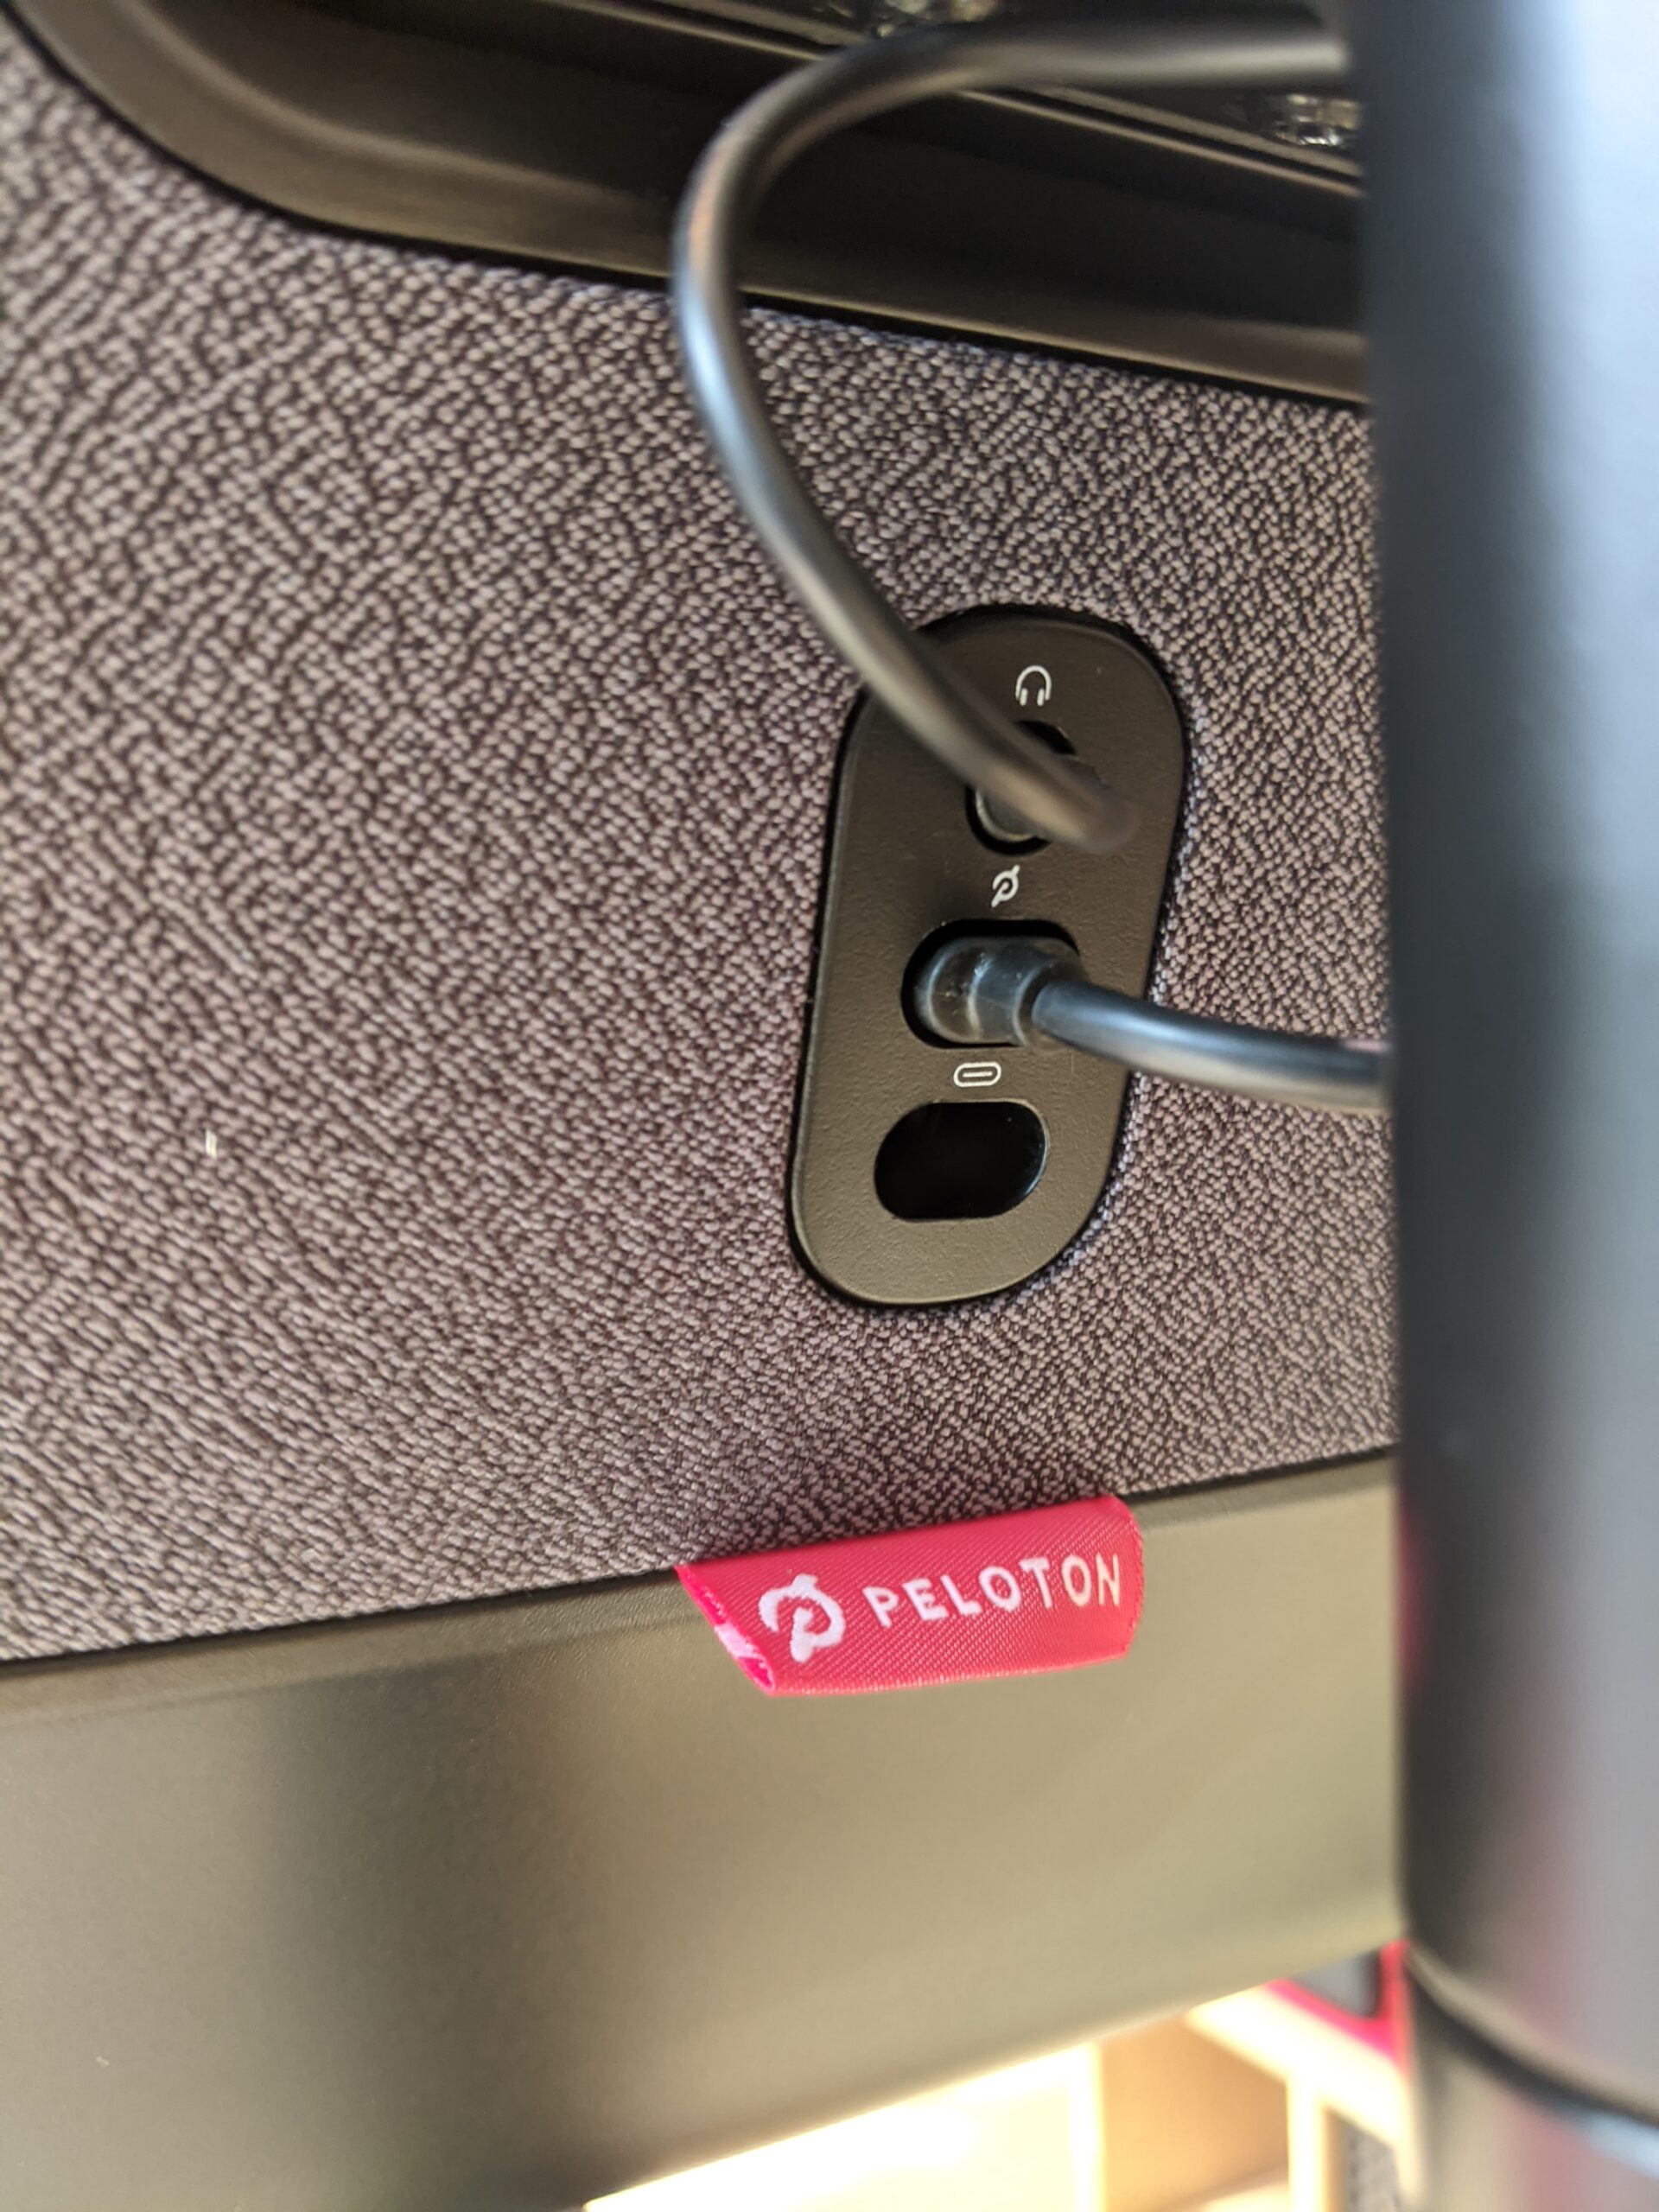
One item missing on the new Bike+ is a physical ethernet port to plug in your bike to the internet, which the original bike had. Peloton says this will still be possible using a USB C->Ethernet adaptor, which is not supplied. Speaking of USB, the bike now has a USB C port built into the back, instead of the micro-USB port that was on the original bike. Peloton states this can be used to power accessories if you wish.
Another change is the new Bike+ now includes user facing speakers. The old bike speakers were on the back of the tablet, and always sounded muffled and washed out to us. We weren’t able to fully blast the speakers, but in our limited tests, the sound did seem improved – but sound is always a very subjective issue.
The system for controlling positioning on the Bike+ also got an overhaul. The original bike had 3 levers for controlling the position of the handlebar height, seat height, and seat depth. The new Bike+ replaces the levers on the handlebar height and seat height with quick-spin knobs. It might be due to the newness of the demo bike, but our subjective opinion was it was easier to adjust these two positions with the new knobs. The third lever on the old bike, which had adjusted the seat fore/aft position, has been replaced by a quick-adjust lock. You simply pull down on the lock, slide the seat, and push the lock back up. This new system for adjusting seat position was definitely a vast improvement to us, and will make sharing a bike much easier. Unfortunately, the new Bike+ did not add any sort of system for adjusting the fore/aft position of the handlebars – like the original Bike, you are stuck with the one position here. However, we’re hearing that on the new Bike+, the closest position of the seat to handlebars is now 15.25″, as opposed to a closest position of 17″ on the original Bike.

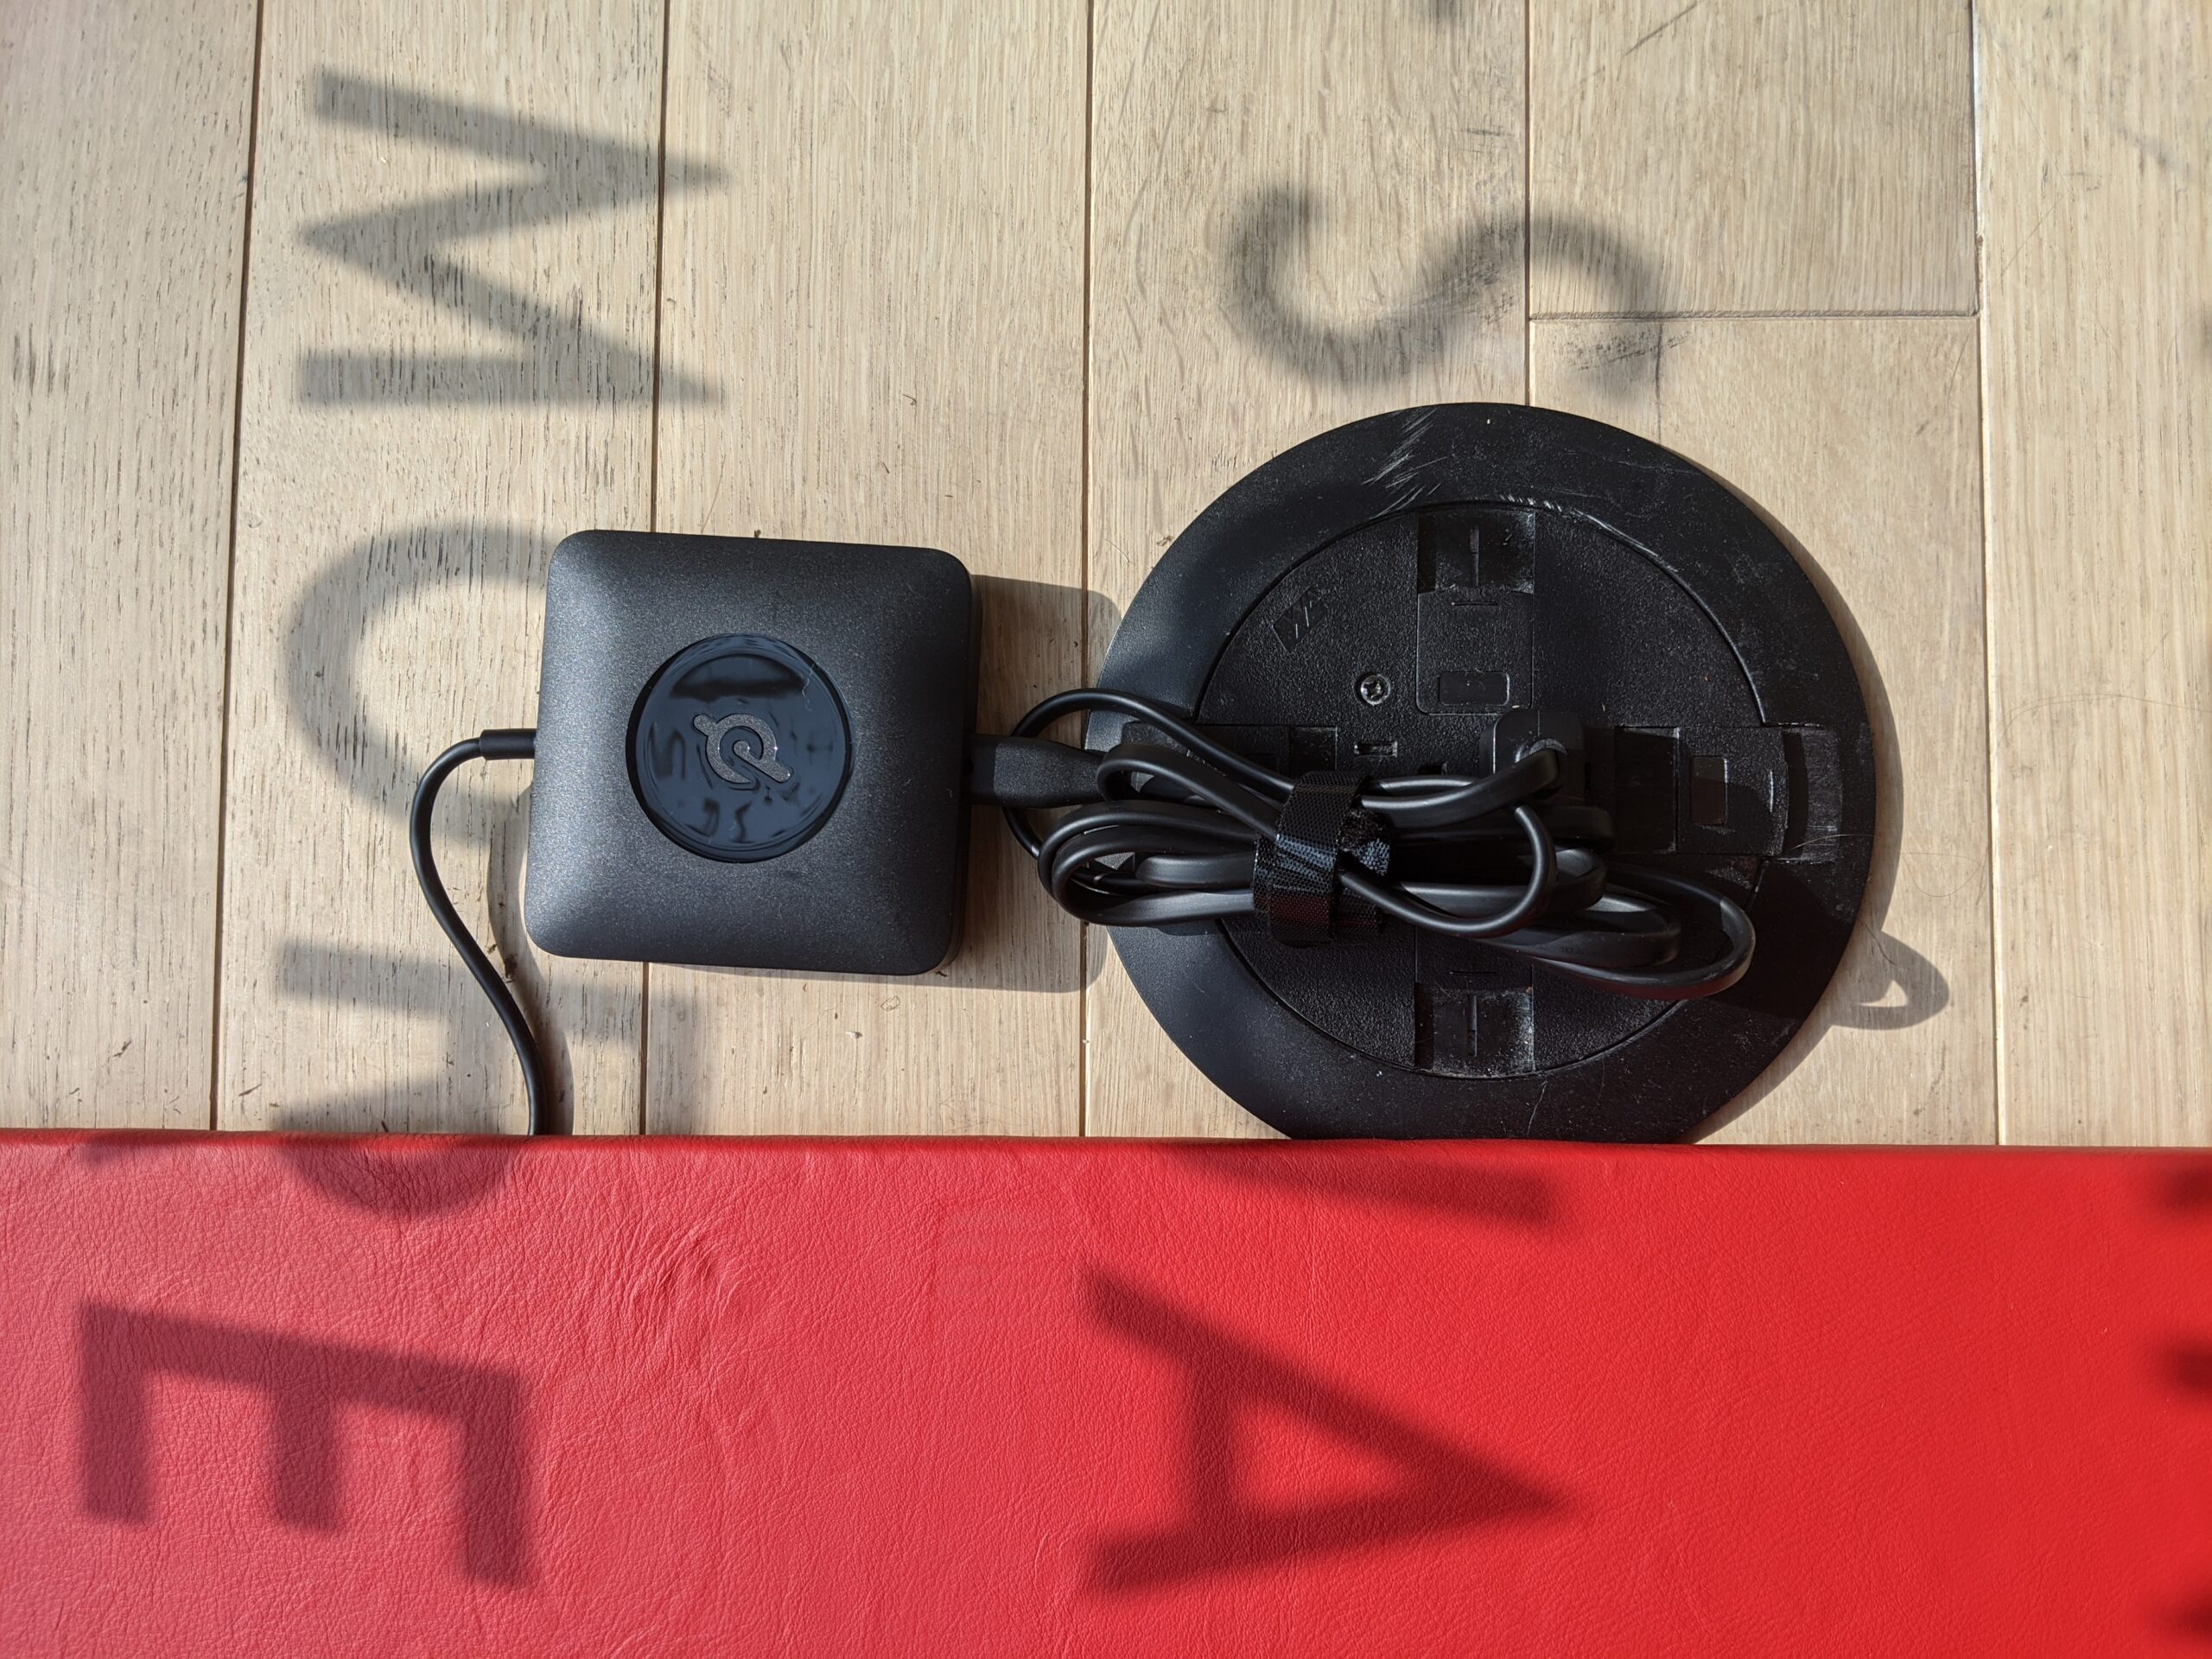
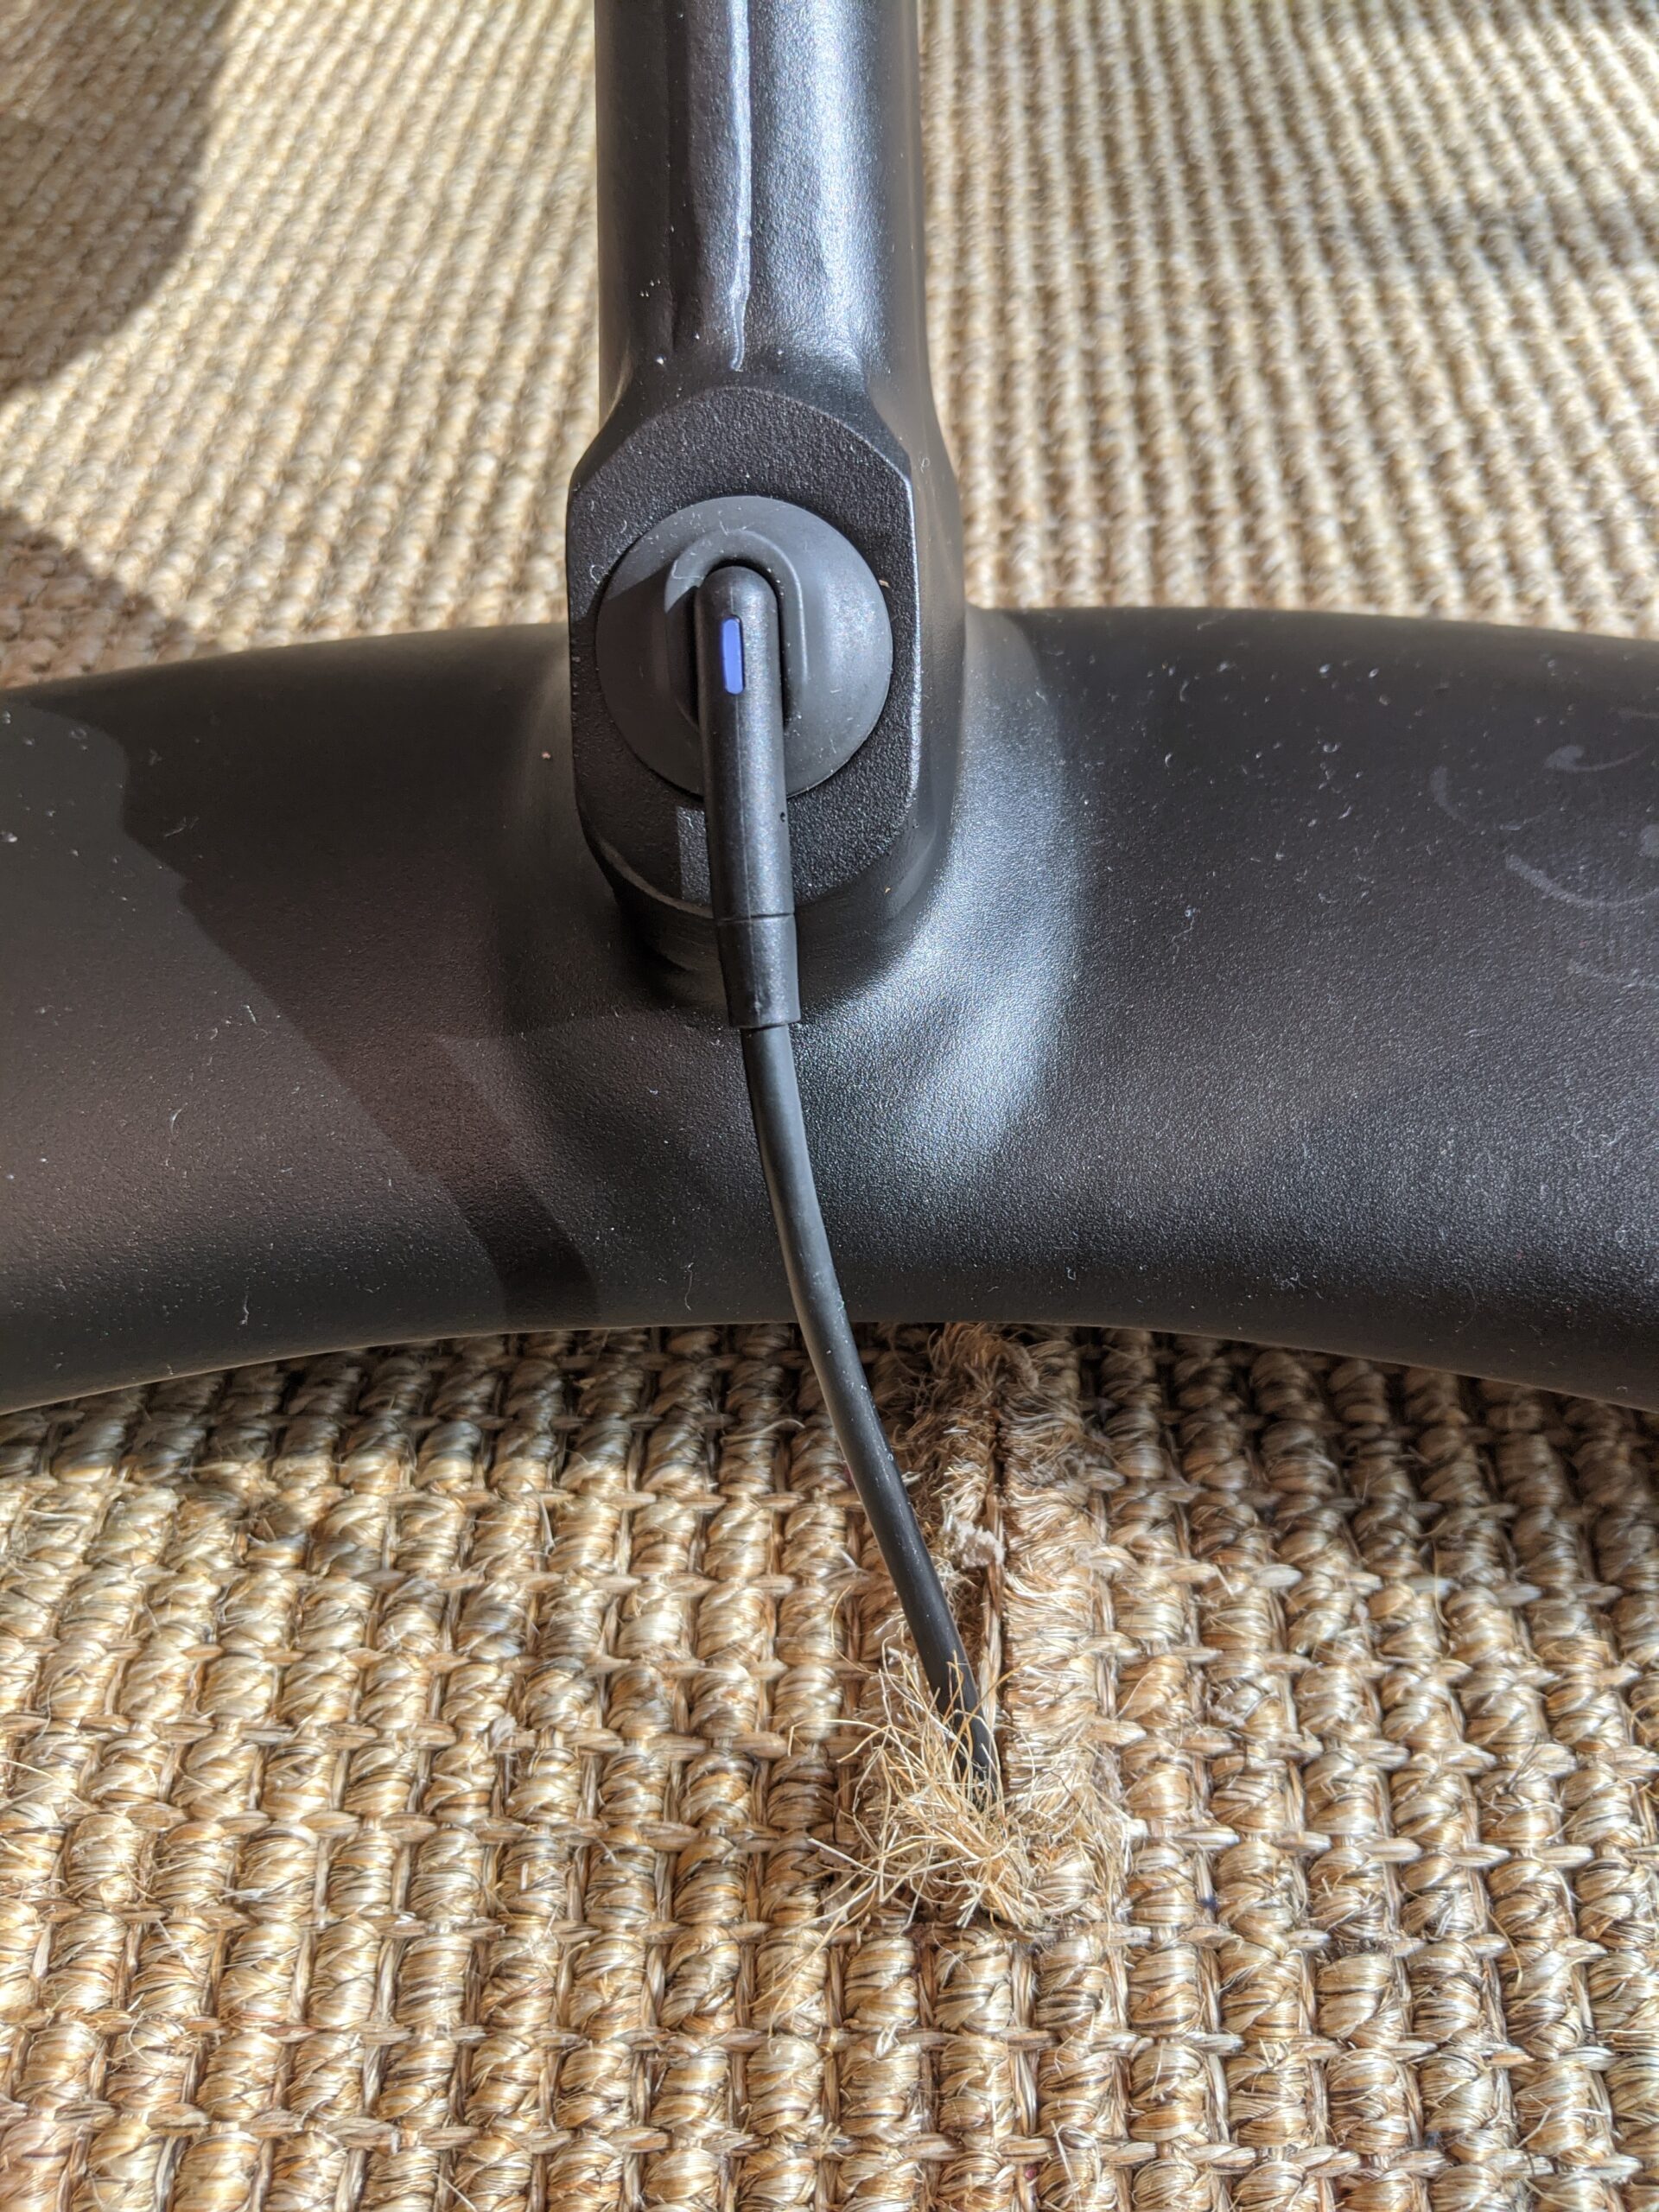
The power brick has also been redesigned. Some of the marketing pictures led people to hope that the power brick had somehow been integrated into the bike, but that is unfortunately not the case. The brick now looks more like an AppleTV. The physical connector of the power cord to the back of the bike has also been modified, now having a slimmer profile to help prevent accidental unplugs.
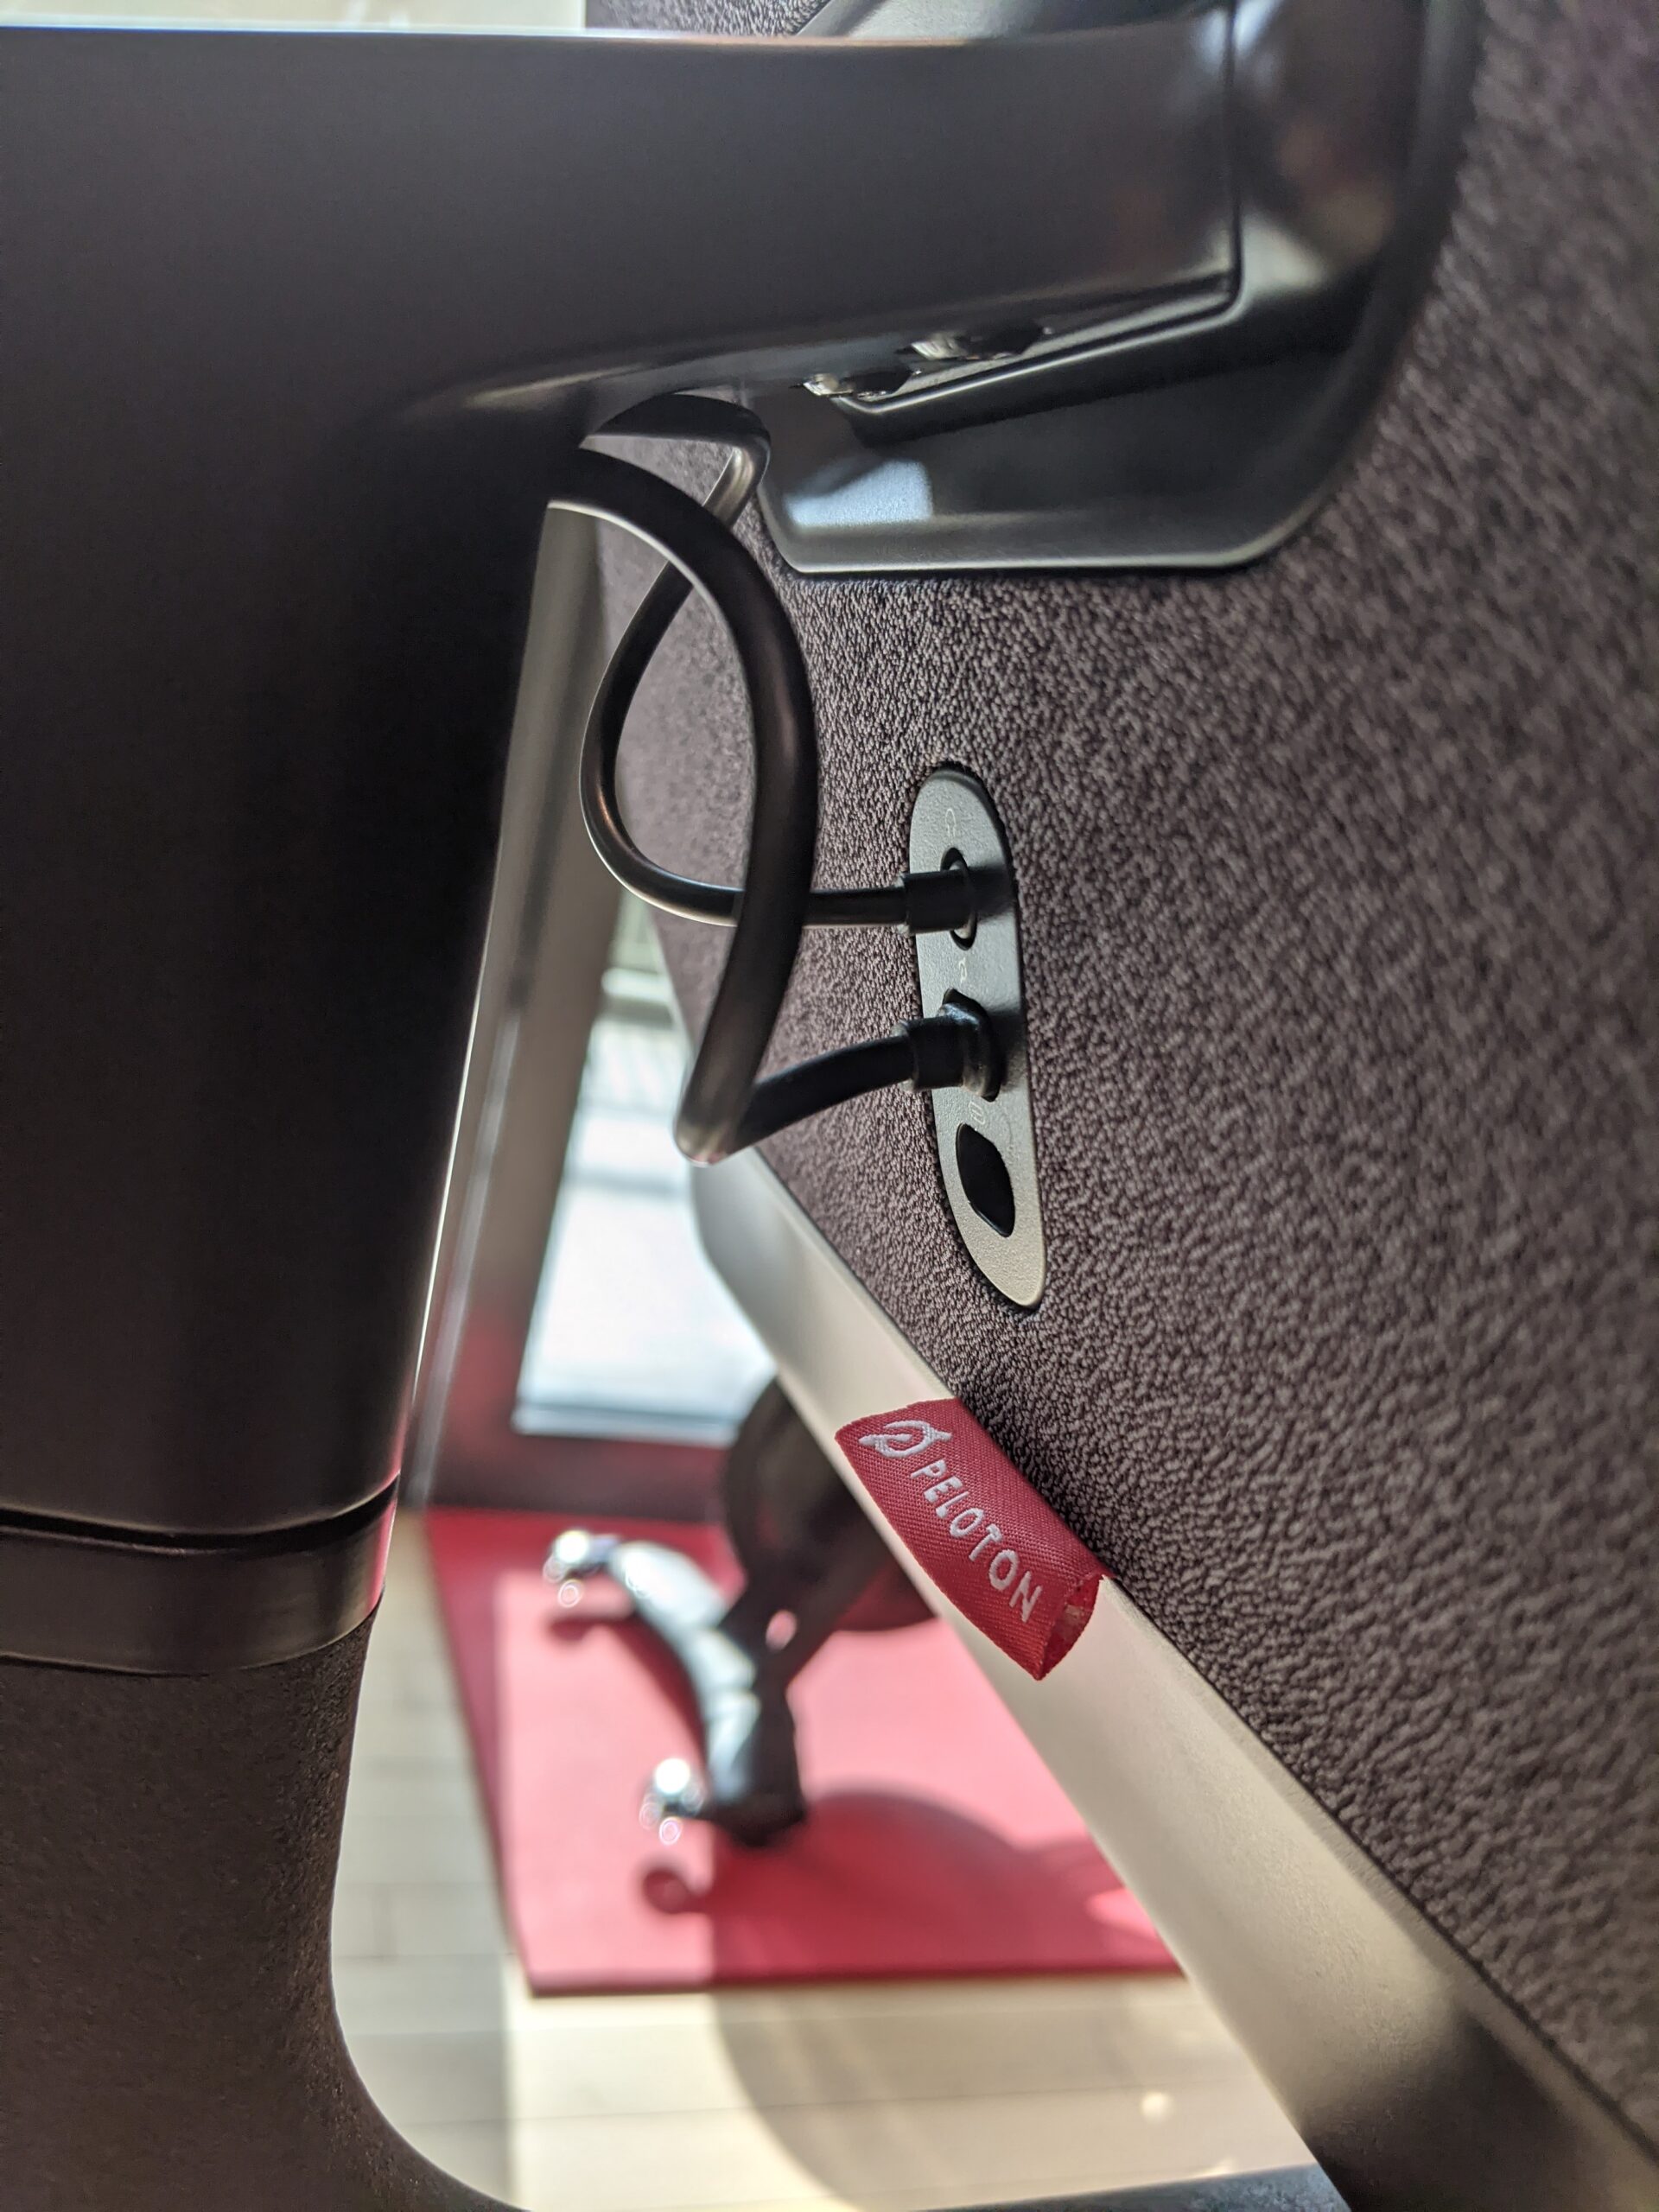
Speaking of cables & cords, Peloton has improved cable management. The old Bike+ had cables that ran along the handlebar post, through the center of the handlebars, to the back of the screen. That wiring has now moved inside the bike, so the cords come out of the back of the tablet right where they need to plug in, making for a cleaner looking bike.
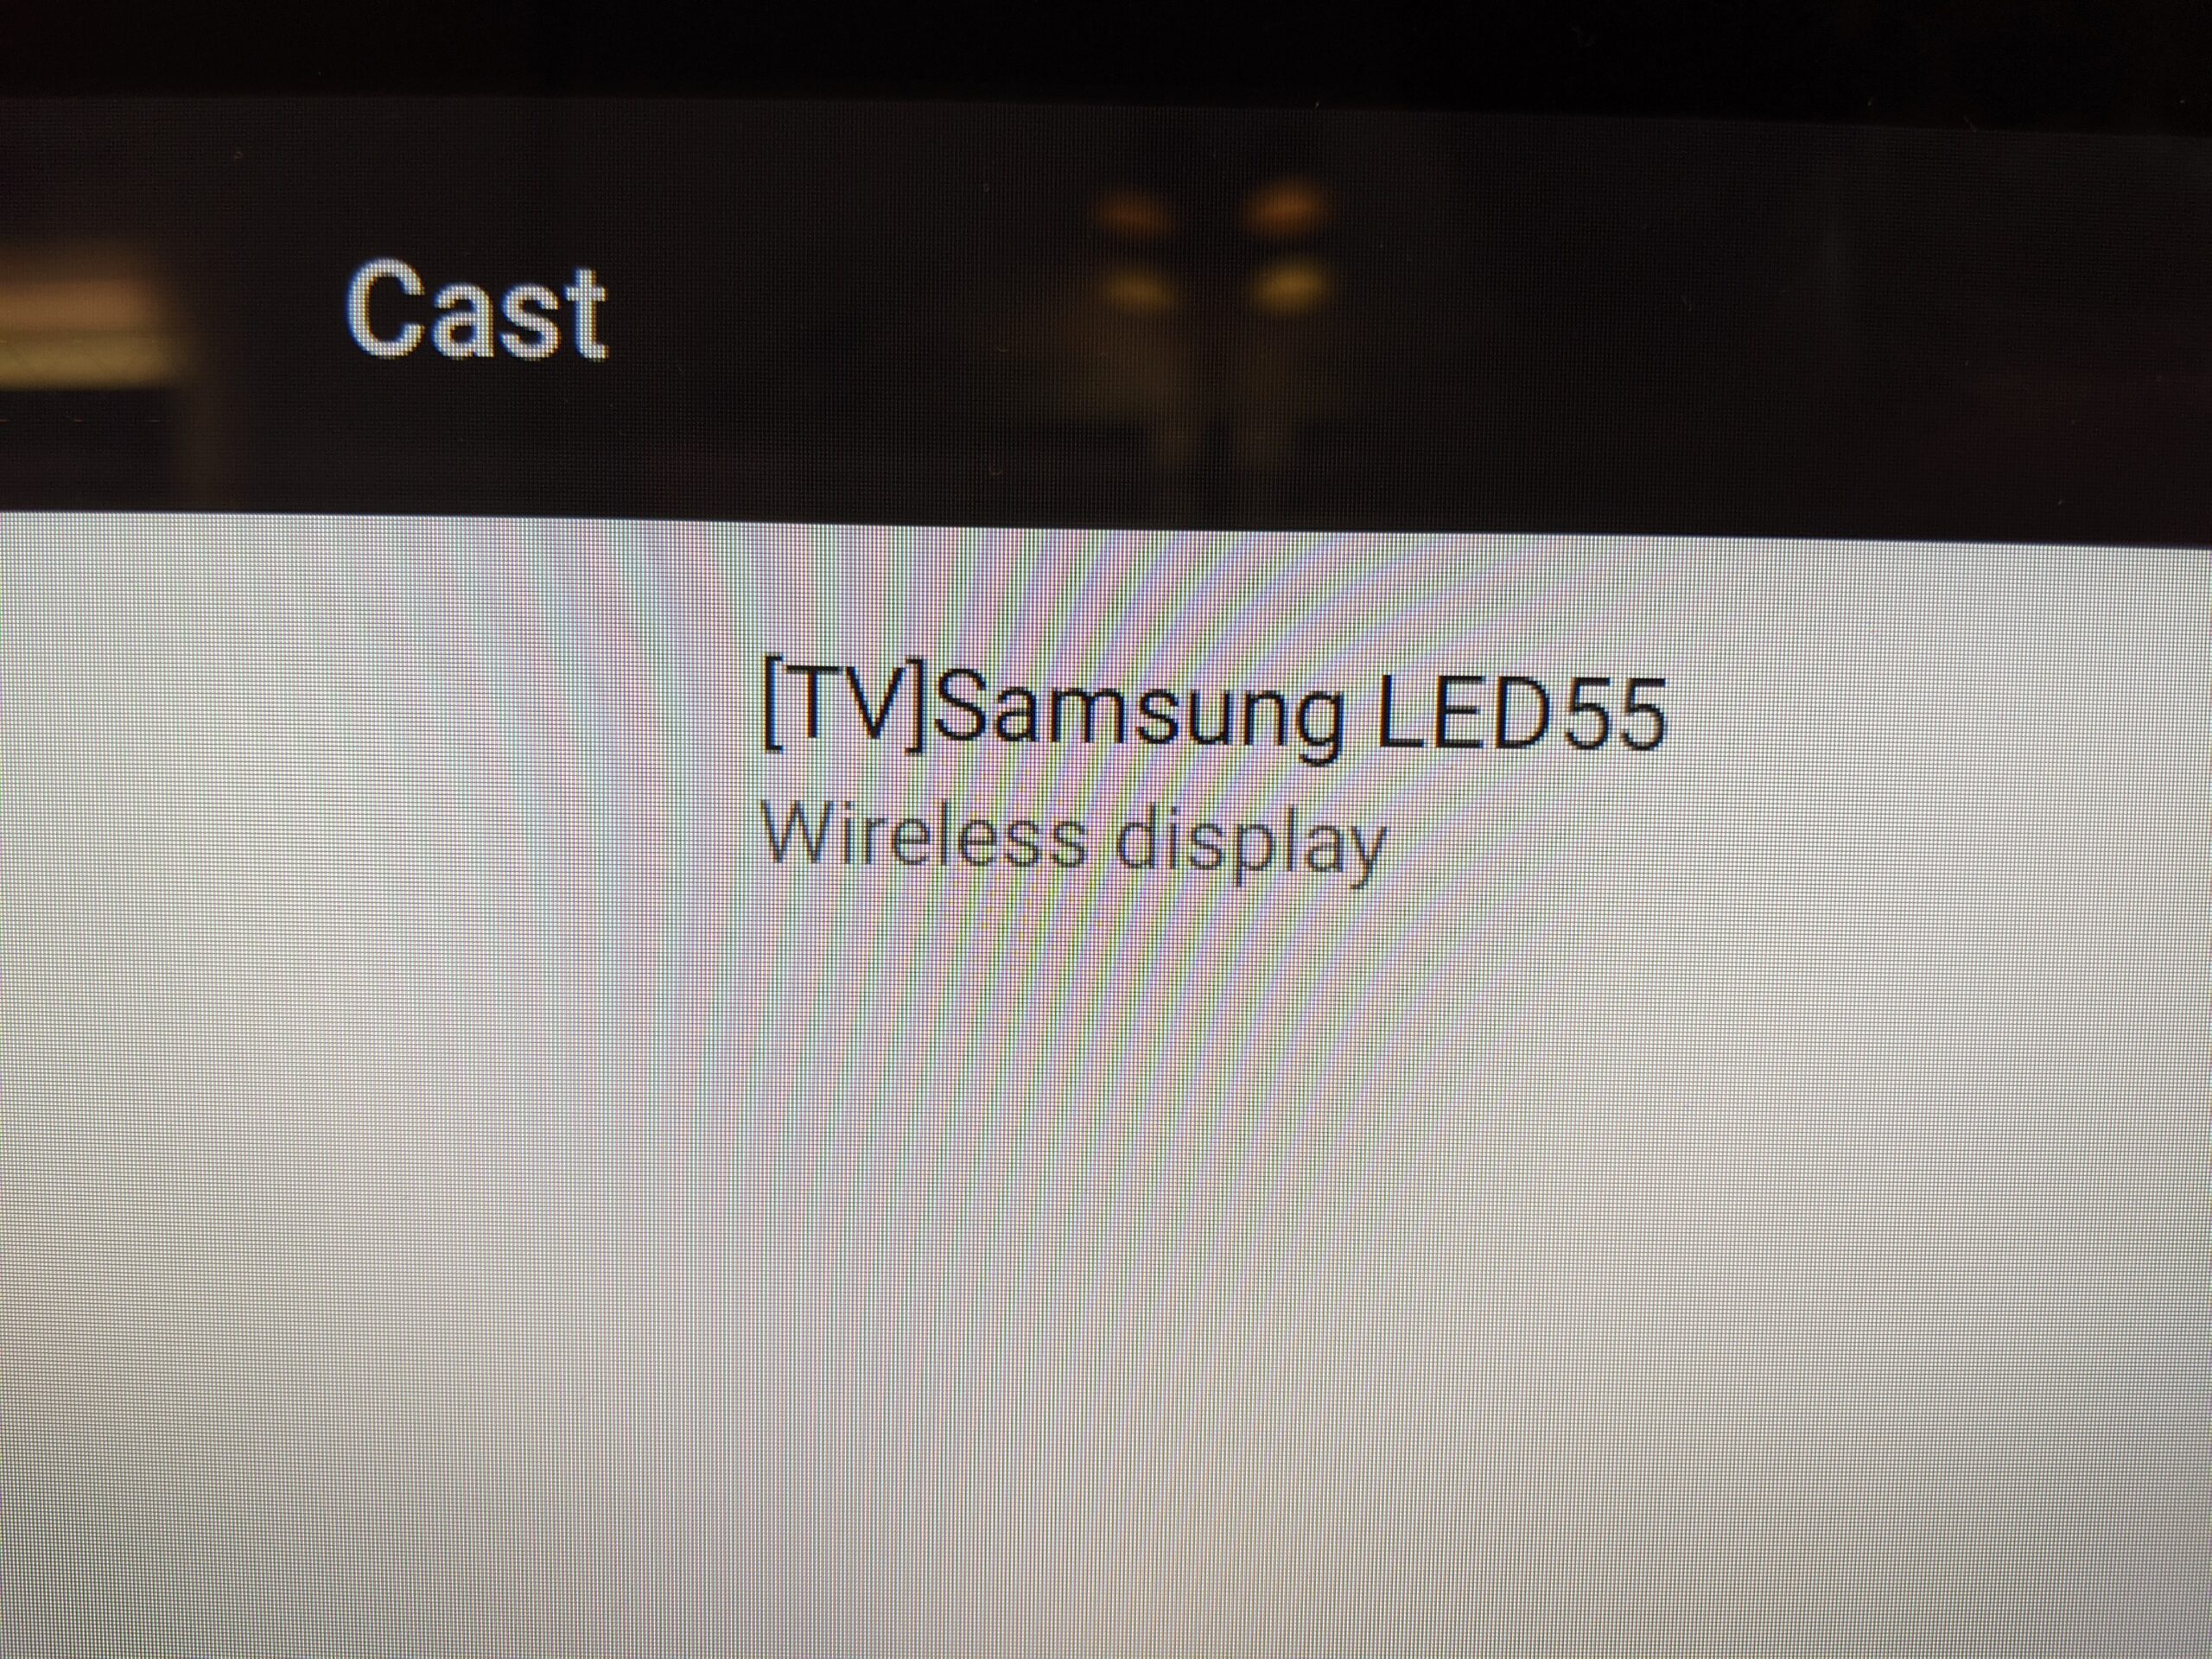
The new Bike+ does still support screen casting. We weren’t able to actually test a cast, but based on what we saw in the system settings and for the device that showed up, we believe it will still connect to any Miracast device, which is the same as the original Bike. Unfortunately, just because the new bike has GymKit support doesn’t mean AirPlay support is coming along too!
The water bottle cages looked slightly modified in the new bike, but nothing too drastic. Same with the weight racks on the back of the bike.
Peloton also updated their on-bike styling. The press-on lettering of the original bike has been changed to raised letters.

Oh, and in terms of actually riding the bike? The actual experience of riding felt about the same to us once we were actually on the bike riding, when we weren’t trying out the new Auto-Follow Resistance. That said, we reserve the right to change our mind on that once we get more time in the saddle with the new Bike+
Do these changes warrant an upgrade for existing users? Or the price increase for new users deciding between the Bike and the Bike+? It’s hard to say – only you can decide how valuable some of these new features are.
If you still have a question about what’s new with the new Bike+ or what’s changed, let us know in the comments and we’ll do our best to answer any questions!
Support the site! Enjoy the news & guides we provide? Help us keep bringing you the news. Pelo Buddy is completely free, but you can help support the site with a one-time or monthly donation that will go to our writers, editors, and more. Find out more details here.
Get Our Newsletter Want to be sure to never miss any Peloton news? Sign up for our newsletter and get all the latest Peloton updates & Peloton rumors sent directly to your inbox.
Has anyone fitted a Bike+ screen to an OG Bike? Is this possible?